What You'll Learn: This guide explains the Recipe View page – your recipe's dashboard in the Ice Cream Calc Web App. You'll learn how to use all the features including quick stats, action cards, recipe cards, ingredient preview, sharing options, and how to customize the view to match your workflow.
Introduction
The Recipe View page is your recipe's home page – a clean dashboard that provides an overview of your recipe and quick access to common actions. Think of it as the "info page" for your recipe.
Key purposes:
- View recipe summary and statistics at a glance
- Access quick actions (edit, produce, reports, share)
- Inspect the ingredient list and review unsaved changes
- View and manage recipe cards
- Share your recipe with others
- Customize which sections are visible to match your workflow
Page Structure Overview
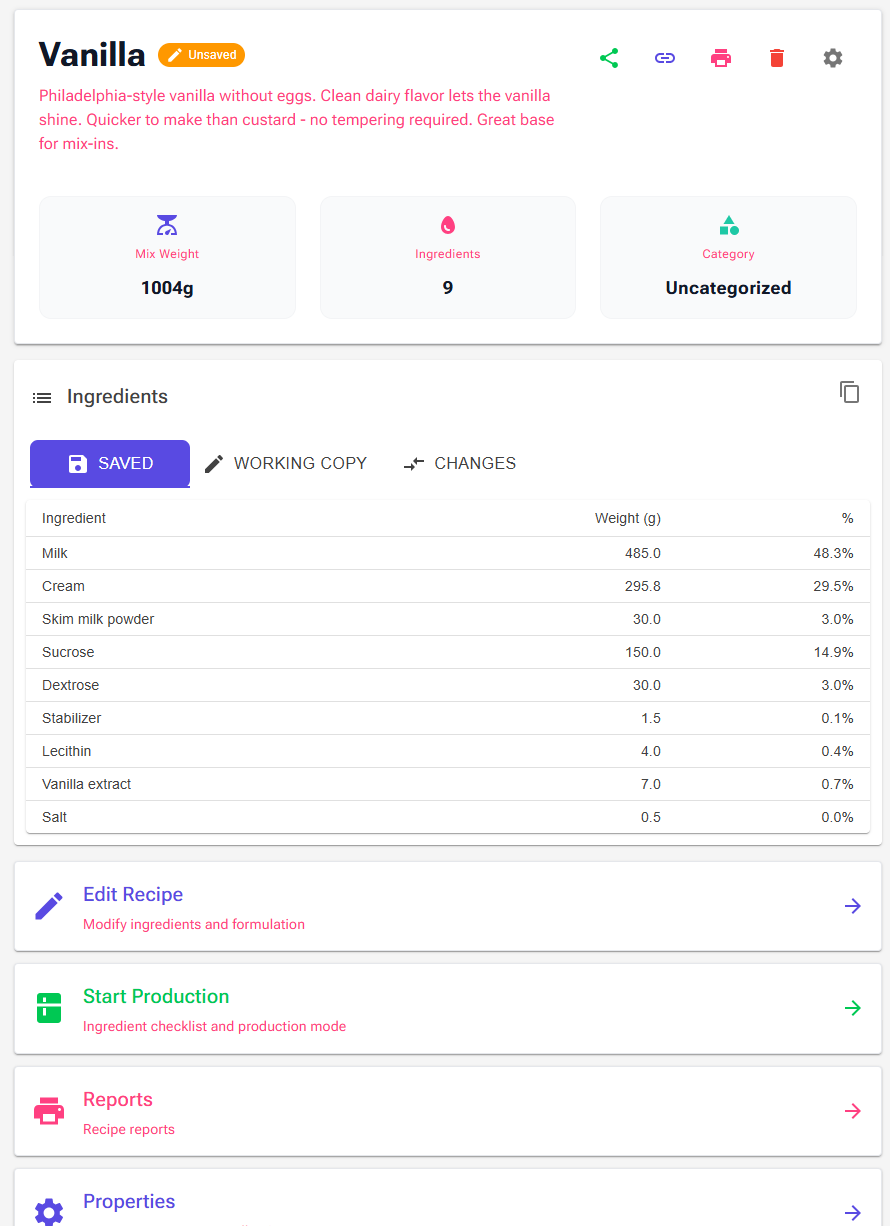
The Recipe View page consists of several distinct sections:
- Header Section – Recipe title, description, and quick stats
- Action Icons (top-right) – Share, Link, Print, Delete, and Customize View
- Ingredients Preview – Quick ingredient list with copy and diff features
- Action Cards – Edit Recipe, Start Production, Reports, Properties, History, and Notes
- Recipe Cards Section – View and manage your recipe cards
Tip: Most sections can be shown or hidden via the Customize View (⚙) icon in the header, so you can tailor the page to the workflows you use most.
Header Section
Recipe Title and Description
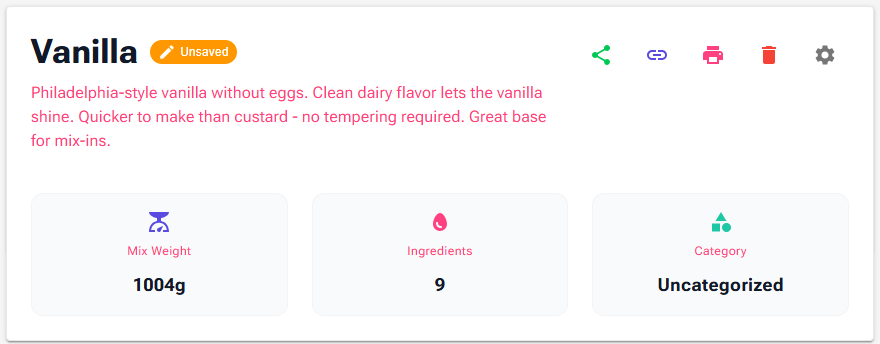
At the top of the page, you'll see:
- Recipe Name – Large heading with your recipe title
- "Unsaved" Chip – An orange chip appears next to the title when your working copy has changes that haven't been saved back to the original recipe. When this chip is visible, the Ingredients section shows tabs to compare saved and working versions (see Ingredients Preview below)
- Description (if set) – Brief description you added in recipe properties
Tip: To edit the recipe name or description, click the Properties action card or use the Properties dialog in the Recipe Editor.
Quick Stats
Three statistics cards provide key information about your recipe:
- Mix Weight – Total weight of all ingredients (before evaporation)
- Ingredients – Total number of ingredients in the recipe
- Category – Recipe category (Ice Cream, Gelato, Sorbet, etc.)
These stats update automatically when you edit the recipe.
Action Icons (Top-Right)
Five icon buttons in the top-right corner provide quick access to sharing, printing, and page settings:
- Share (green) – Share recipe with the community (public sharing)
- Link (blue) – Generate a private share link
- Print (gray) – Open the recipe card in print mode
- Delete (red) – Delete or archive the recipe (depending on whether it has dependencies)
- Customize View (⚙) – Toggle which sections are visible on this page
Mobile Note: On mobile devices, these icons appear below the title section for easier access.

Ingredients Preview
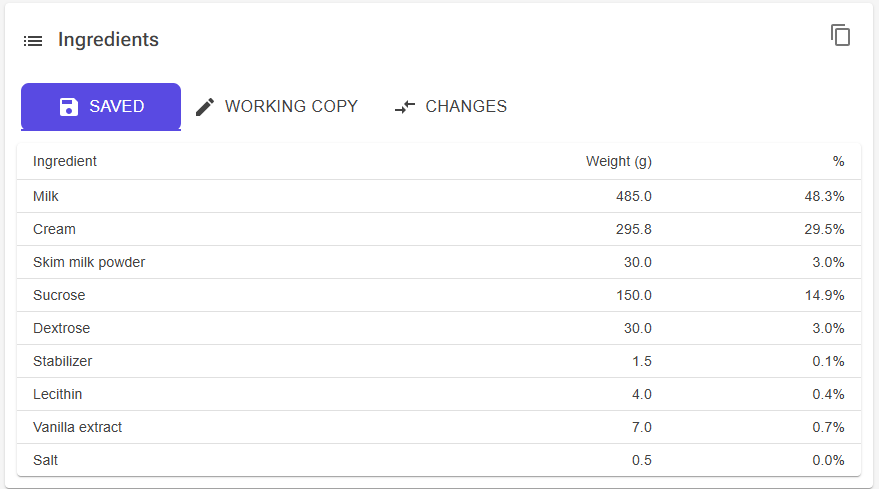
The Ingredients Preview shows your recipe's ingredients in a simple table with weight and percentage of total mix. It's a quick reference so you can see the recipe composition without opening the editor.
What it shows:
- Ingredient name
- Weight (grams)
- Percentage of total mix weight
Copy Ingredients
The copy icon in the top-right of the Ingredients section opens a menu with two options:
- Copy as text – Tab-separated plain text, ideal for pasting into notes, emails, or spreadsheets
- Copy as HTML table – A formatted table that pastes nicely into rich-text editors like Word, Gmail, or Outlook
Both formats include the recipe name, a row per ingredient with weight and percentage, and a total row.
Working Copy and Changes View
If you have an unsaved working copy (the "Unsaved" chip is visible next to the title), the Ingredients section switches to a tabbed view so you can compare versions:
- Saved – The ingredients as currently stored in the recipe
- Working Copy – The ingredients in your in-progress edit
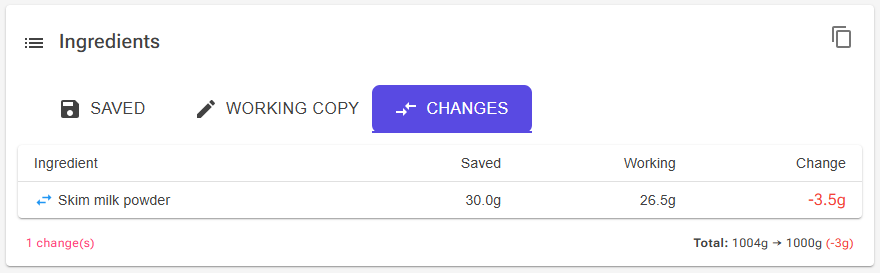
- Changes – A diff table showing exactly what's changed:
- Added ingredients (green)
- Removed ingredients (red)
- Modified weights with the delta in grams
A summary at the bottom of the Changes tab shows the total mix weight before and after, plus the overall change.
Tip: The Copy Ingredients menu follows whichever tab is active, so you can copy either the saved version or the working copy depending on what you need.
Mobile Note: On mobile, the ingredients preview is hidden by default to keep the page compact. You can enable it via Customize View if you want it on mobile too.
Action Cards
Action cards provide quick access to the most common recipe operations. Each card shows an icon, title, description, and arrow indicating it's clickable. You can toggle which cards appear via the Customize View icon.
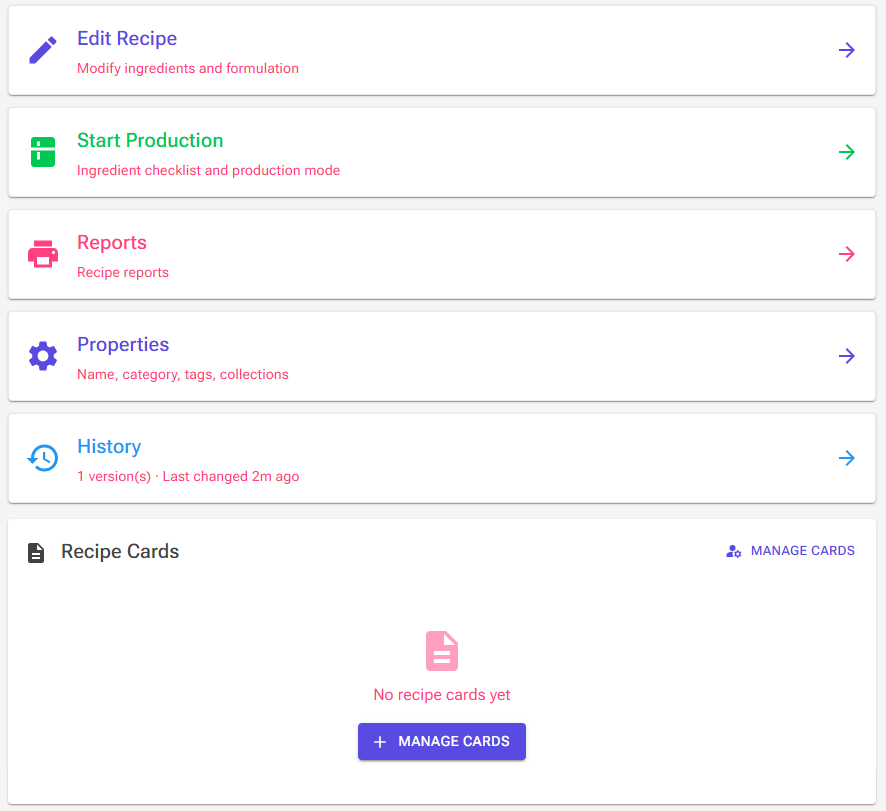
Edit Recipe Card (Blue)
Purpose: Opens the Recipe Editor for detailed editing
What it does:
- Takes you to the Recipe Editor page
- Loads the recipe with all editing tools available
- Creates a temporary working copy for safe editing
When to use: Any time you need to modify ingredients, adjust weights, balance the recipe, or make changes to the formulation.
Always visible – cannot be hidden.
Start Production Card (Green)
Purpose: Opens production mode with ingredient checklist
What it does:
- Takes you to the Produce page
- Shows all ingredients with checkboxes
- Allows batch scaling (1x, 2x, 3x, etc.)
- Logs production when you mark as complete
When to use: When you're ready to make the recipe and want to track ingredient usage or log production.
Learn More: See the Production System Guide for details about production tracking and logging.
Reports Card (Gray)
Purpose: Generate and print recipe reports
What it does:
- Opens the report template dialog
- Lets you choose from available recipe report templates (recipe cards, labels, technical specs, etc.)
- Generates a printable or exportable output
When to use: When you need printable output from the recipe – labels for storage containers, technical spec sheets, production cards, or any custom template you've set up.
Formerly "Print Labels" — now handles any report template type.
Properties Card (Blue)
Purpose: Edit recipe metadata
What it does:
- Opens the Properties dialog
- Lets you edit the recipe name, description, category, and tags
- Manages which collections the recipe belongs to
When to use: When you want to rename a recipe, change its category, add tags, or organize it into collections without opening the full Recipe Editor.
History Card (Blue) – Premium
Purpose: View and restore previous recipe versions
What it does:
- Opens the Recipe History dialog
- Shows a timeline of saved versions
- Lets you restore an earlier version
The card itself shows the version count and when the recipe was last changed (e.g., "3 version(s) · Last changed 2d ago"). If no versions have been recorded yet, it shows "No changes recorded yet".
When to use: When you've made changes you want to undo, or when you want to compare the current recipe with a previous version.
Premium feature: The History card only appears for Premium subscribers.
Notes Card (Blue)
Purpose: Display the recipe's notes
What it does:
- Shows any free-form notes you've added to the recipe
- Preserves line breaks so formatted notes stay readable
The Notes card only appears if the recipe has notes and the option is enabled in Customize View. Notes are edited from the Recipe Editor.
Mobile Layout: On mobile devices, the action cards stack vertically with Start Production appearing first for easier access during production.
Recipe Cards Section
The Recipe Cards section displays all available recipe cards for this recipe, including both recipe-specific cards and global template cards.
What Are Recipe Cards?
Recipe cards are customizable, printable, and shareable versions of your recipe. You can create multiple cards for different purposes:
- Social media cards – With beautiful images and descriptions
- Technical spec sheets – With calculated data and no fluff
- Production cards – With ingredients and instructions
- Nutrition labels – With detailed nutritional information
Card Types Displayed
You'll see two types of cards in this section:
- Recipe-Specific Cards (blue "Recipe" badge) – Cards created specifically for this recipe
- Global Cards (green "Global" badge) – Reusable template cards that work with any recipe
Card Information
Each card tile shows:
- Card Name – The title of the card
- Type Badge – "Global" (green) or "Recipe" (blue)
- Share Indicator – Share icon appears if the card is publicly shared
- Created Date – When the card was created
- View Button – Click to view the card
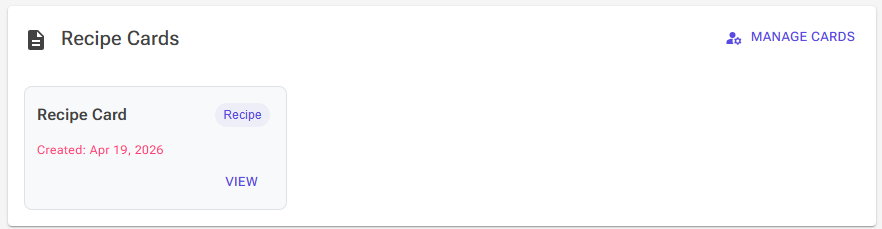
Working with Recipe Cards
Viewing a Card:
- Click anywhere on a card tile (or click the "View" button)
- Opens the card in view mode
- Shows the full formatted card
Managing Cards:
- Click the "Manage cards" button (top-right of section)
- Opens the Card Manager page
- Create new cards, edit existing cards, or delete cards
Empty State: If you haven't created any cards yet, you'll see a message with a button to manage cards.
Learn More: See the Recipe Cards Guide for complete information about creating, customizing, and sharing recipe cards.
Shared Card Indicators
Cards that have been publicly shared show a small green share icon next to their badge. This indicates the card has an active public share link that others can access.
Mobile Layout: On mobile devices, recipe cards display in a horizontal scrollable row for easier browsing.
Sharing Your Recipe
Community Sharing (Green Share Icon)
Purpose: Share your recipe publicly with the Ice Cream Calc community
How to use:
- Click the Share icon (green) in the header
- If this is your first time sharing, a dialog appears asking you to set up your sharing profile (display name, etc.)
- A Quick Share dialog appears where you add a title, description, and any images
- Click "Share" to publish
- Your recipe appears in the Explore page for others to discover
Already shared? Clicking the Share icon for a recipe you've already shared takes you to the share editor so you can update the shared version.
What gets shared:
- Recipe name, category, and tags (from recipe properties)
- Description and images you add during sharing
- Complete ingredient list and calculated data
- Your sharing profile display name as the creator
Benefits:
- Share your creations with the community
- Get feedback and ratings from other users
- Build your reputation as a recipe creator
- Help others learn ice cream making
Private Link Sharing (Blue Link Icon)
Purpose: Generate a secure private link to share with specific people
How to use:
- Click the Link icon (blue) in the header
- The Share Link dialog appears
- Click "Copy Link" to copy the unique URL
- Share the link via email, messaging, or any channel
What recipients see:
- Clean recipe view without app navigation
- Complete ingredient list and data
- "Made with Ice Cream Calc" badge
- View count tracking
Benefits:
- Share privately without publishing to the community
- No recipient account required
- Secure unique URLs
- Track how many times the link is viewed
Note: Private links remain private – they don't appear in the Explore page or search results.
Printing the Recipe
Print Icon (Gray)
Purpose: Open the recipe card designer in print mode
How to use:
- Click the Print icon (gray) in the header
- The recipe card designer opens with the print layout pre-selected
- Configure the card layout as needed
- Use your browser's print dialog to print or save as PDF
For other printable outputs: Use the Reports action card instead – it lets you choose from any available report template (labels, spec sheets, custom templates, etc.).
Tip: Create different recipe cards for different printing purposes (quick reference, detailed instructions, technical specs, etc.).
Deleting a Recipe
Delete Icon (Red)
Purpose: Delete or archive the recipe
Before deleting, the app checks whether the recipe has any dependencies – production runs, packing tasks, sales orders, or other records that reference it. The behaviour depends on what it finds.
If there are no dependencies
- Click the Delete icon (red) in the header
- A confirmation dialog appears
- Click "Delete" to permanently remove the recipe
If there are dependencies
- Click the Delete icon (red) in the header
- A dialog lists the dependencies (for example, "Used in 3 production runs")
- You can Archive the recipe instead – it's hidden from the main Recipes list, but all history and references are preserved
- Archived recipes can be restored later from the archived view
Why this matters: Production history, packing records, and other business data reference recipes by ID. Archiving instead of deleting protects that history while removing the recipe from your everyday view.
What gets deleted (when no dependencies):
- The recipe itself
- All recipe-specific cards
- Temporary working copy (if editing)
- Share links for this recipe
⚠️ Warning: Deletion is permanent and cannot be undone. If in doubt, archive instead – or use "Save As" in the Recipe Editor to make a backup before deleting.
Customize View
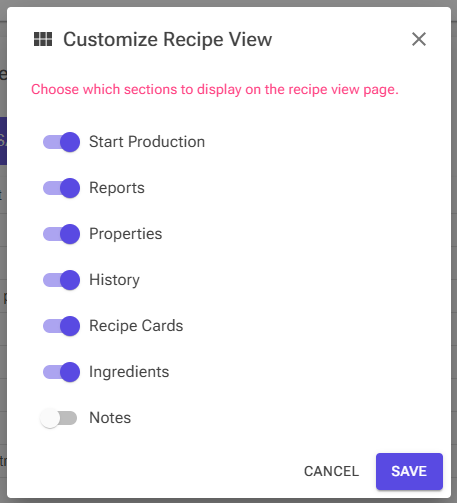
The Customize View (⚙) icon opens a dialog where you can toggle which sections appear on the Recipe View page. Your preferences are saved per user, so the page stays the way you like it across sessions.
Toggleable sections:
- Start Production – Show/hide the green production action card
- Reports – Show/hide the Reports action card
- Properties – Show/hide the Properties action card
- Recipe Cards – Show/hide the Recipe Cards section
- Ingredients – Show/hide the Ingredients Preview section
- Notes – Show/hide the Notes card (only appears when the recipe has notes anyway)
- History – Show/hide the History card (Premium only)
Always visible: The Edit Recipe card, the header, and the action icons cannot be hidden.
Typical setups:
- Production-focused: Hide Ingredients and Properties to keep the page minimal; show Start Production and Reports prominently
- Formulation-focused: Show Ingredients (with the diff view for working copies) and hide Reports and Production
- Minimal: Hide everything optional and just use the Edit Recipe card to jump straight to the editor
Navigation Tips
Getting to Recipe View
There are several ways to access the Recipe View page:
- From the Recipes list: Click any recipe name
- From the Recipe Editor: Click the "View" button
- From URL: Navigate to
/recipe/{id}/view
Quick Actions
- Need to edit? Click "Edit Recipe" card → Recipe Editor
- Ready to produce? Click "Start Production" card → Produce page
- Need a report? Click "Reports" card → Report template dialog
- Change metadata? Click "Properties" card → Properties dialog
- Want to share? Click Share or Link icon → Sharing options
- Need a recipe card? Click "Manage cards" button → Card Manager
Back Navigation
A "Back" button appears at the top of the page. Where it takes you depends on how you arrived:
- From Recipes list: Back to Recipes
- From Home: Back to Home
- From Editor: Back to Recipes (default)
Common Workflows
Quick Recipe Review
- Open Recipe View page
- Check quick stats (weight, ingredient count, category)
- Scan ingredients preview
- Done – no editing needed
Review a Working Copy Before Committing
- Make changes in the Recipe Editor (creates a working copy)
- Return to Recipe View
- The orange "Unsaved" chip appears next to the title
- In the Ingredients section, switch to the Changes tab
- Review added, removed, and modified ingredients with weight deltas
- Commit or discard from the Recipe Editor
Generate a Report
- Open Recipe View page
- Click the Reports action card
- Choose a template from the dialog
- Configure and generate the report
Start Production
- Open Recipe View page
- Click "Start Production" card
- Scale batch if needed (1x, 2x, etc.)
- Check off ingredients as you add them
- Click "Mark as Produced"
Share with a Friend
- Open Recipe View page
- Click the Link icon (blue)
- Click "Copy Link"
- Send the link via email or message
Copy Ingredients to Another App
- Open Recipe View page
- Click the copy icon in the top-right of the Ingredients section
- Choose "Copy as text" or "Copy as HTML table"
- Paste into your target app
Tips and Best Practices
Use Recipe View as Your Recipe Hub
- Bookmark Recipe View pages for frequently-used recipes
- Start production directly from Recipe View (faster than navigating through the editor)
- Use Recipe View to show recipes to others (cleaner than the editor)
Tune the Layout to Your Workflow
- Use Customize View to hide sections you never use – the page gets shorter and faster to scan
- If you mostly produce existing recipes, keep Start Production and Reports visible and hide the rest
- If you mostly develop new recipes, keep Ingredients visible so you can review working-copy diffs
Organize with Recipe Cards
- Create multiple cards for different purposes (social, production, technical)
- Use global cards for consistent formatting across all recipes
- Share specific cards rather than the full recipe for targeted audiences
Working-Copy Hygiene
- If you see the "Unsaved" chip, check the Changes tab before starting production – production uses the saved recipe, not the working copy
- Discard or commit working copies regularly so they don't silently diverge from the saved recipe
Quick Access on Mobile
- Add Recipe View page to your home screen (works like an app)
- "Start Production" card appears first on mobile for quick access
- Swipe through recipe cards horizontally for quick browsing
Summary
The Recipe View page is your recipe's dashboard – a clean, organized view that provides:
- Quick Overview – Stats, title, description, and unsaved-changes indicator at a glance
- Fast Actions – Edit, Produce, Reports, Properties, History, and Notes with one click
- Ingredient Inspection – Copy to clipboard, or compare saved vs working copy with a diff view
- Card Management – View and access all your recipe cards
- Sharing Options – Community or private sharing
- Customizable Layout – Toggle sections on or off to match your workflow
- Mobile-Optimized – Works great on all devices
Remember:
- Use Recipe View for overview and quick actions
- Use Recipe Editor for detailed editing and balancing
- Use Customize View (⚙) to tailor the page to your workflow
- Navigate between View and Editor easily with View/Edit buttons
Next Steps
Explore related topics:
- Recipe Editor Interface Guide – Master the detailed editing tools
- Recipe Cards Guide – Create and customize beautiful recipe cards
- Production System Guide – Track production and manage inventory
- Recipe Balancing Guide – Balance recipes to target properties
Happy ice cream making! 🍦