Introduction
If you sell your ice cream, the tub needs an ingredient list: every component of the finished product, in descending order of weight, with allergens standing out from the text around them. Ice Cream Calculator can build that declaration for you — but only once you have told it what your ingredients are actually made of.
That is what the sub-ingredient and allergen system is for. You set it up once per ingredient, and from then on every label, recipe card and report you generate carries a correct declaration, recalculated automatically whenever you change a recipe. Adjust a weight in the recipe editor and the percentages, the ordering and the allergen statements all follow.
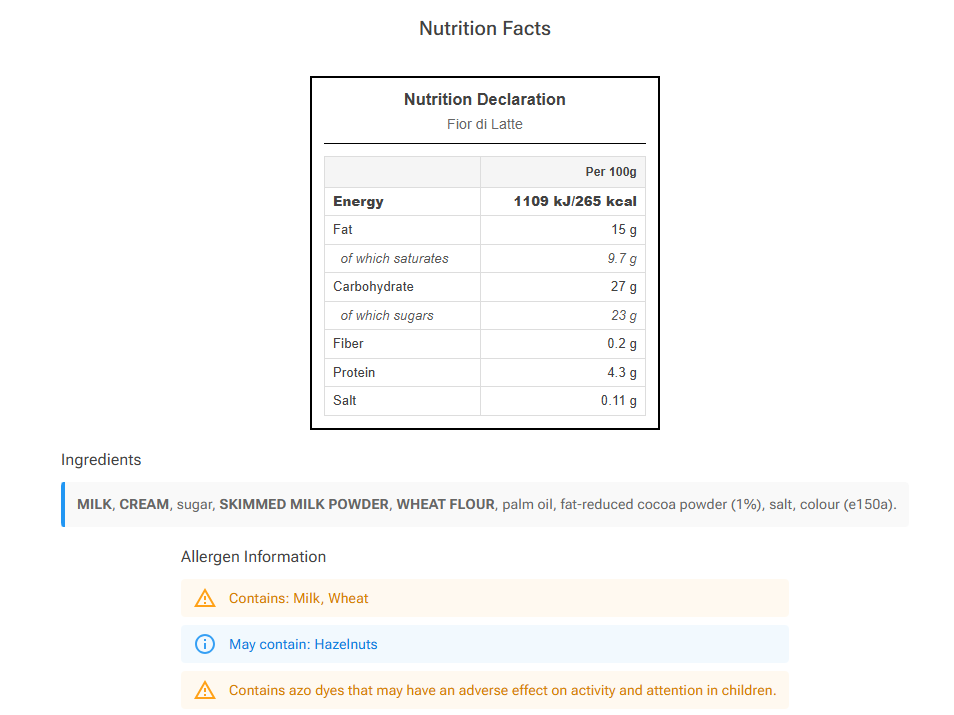
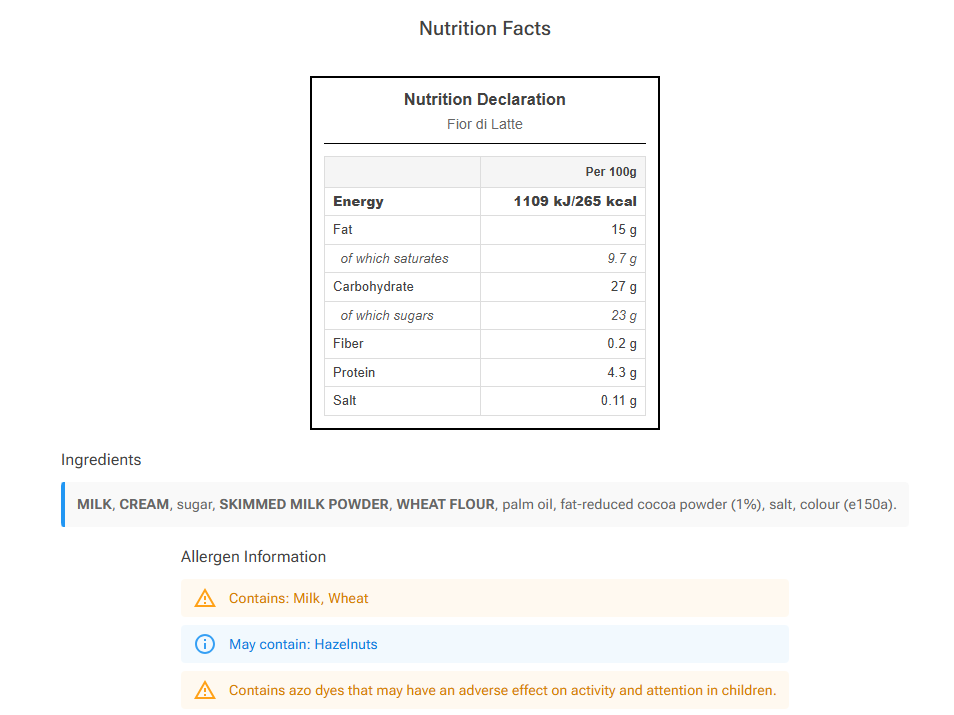
This article walks through the whole path: defining your allergens and ingredient groups — by hand or from a built-in legal template — adding sub-ingredients to an ingredient, how the app merges it all into a single declaration, and where that declaration shows up. You need to be logged in to use any of it, and the optional AI Estimate feature requires Premium.
Note: If you only need nutrition values and not a printed ingredient list, you can skip all of this. Energy, fat, sugars and the rest are calculated from your ingredient data whether or not sub-ingredients are set up.
Important: Labeling data lives on your own personal ingredients. If your recipes are built from standard library ingredients, convert those to personal ingredients first — the Convert to Personal Ingredients tool does this for whole recipes in one pass, and keeps any label data the standard ingredient already carried.
Why Sub-Ingredients Matter
Your recipe is built from ingredients with names that make sense to you — "Cookie crumbs", "Vanilla base", "Caramel sauce". A legal ingredient declaration is different: it has to list what is actually inside the finished product, in descending order of weight, with allergens made visually distinct from the rest of the text.
Sub-ingredients are how you tell Ice Cream Calculator what each of your ingredients is made of. Once that information is in place, the app can build the full declaration for you, automatically, every time you generate a label or report.
Setting up sub-ingredients and allergens unlocks four things you cannot get otherwise:
- A real ingredient declaration — every component from every ingredient, merged and sorted by weight, instead of a flat list of your internal ingredient names.
- Allergen highlighting — allergens printed in BOLD UPPERCASE inside the ingredient list, as most food labeling regulations require.
- Percentage declarations — showing the calculated amount after an ingredient, e.g. "sugar (18%)", for ingredients you highlight or emphasise on the pack.
- Allergen statements in your own wording — "Contains", "May contain", and free-text warnings, written the way your market expects them.
Important: Highlighting is a property of a sub-ingredient row. An ingredient with no rows has nothing to carry the highlight flag, so it can never print in bold uppercase — no matter which allergens you have assigned to it. This is the single most common reason people ask why their allergens are not showing up in bold.
So sub-ingredients do two distinct jobs, and most ingredient libraries need both:
- Highlighting a simple ingredient that is itself an allergen — cream, milk, hazelnuts.
- Breaking down a compound ingredient into what it is actually made of — a bought cookie, a chocolate coating, your own caramel.
Simple Ingredients That Are Allergens
An ingredient with no sub-ingredients enters the declaration correctly on its own: under its own name, at its own weight share of the recipe. For sugar, water, or glucose syrup that is all you need — nothing to set up.
But a great many single-component ingredients are allergens: cream, milk, egg yolk, skimmed milk powder, hazelnuts, wheat flour. In most markets these must be highlighted in the ingredient list just like any other allergen. To make that happen, give the ingredient exactly one sub-ingredient row — its own name, at 100%, with Highlight ticked.
| Your ingredient | Sub-ingredient rows needed | Result on the label |
|---|---|---|
| Sugar | None | sugar |
| Cream 40% | cream — 100% — Highlight ✔ | CREAM |
| Hazelnuts, roasted | hazelnuts — 100% — Highlight ✔ | HAZELNUTS |
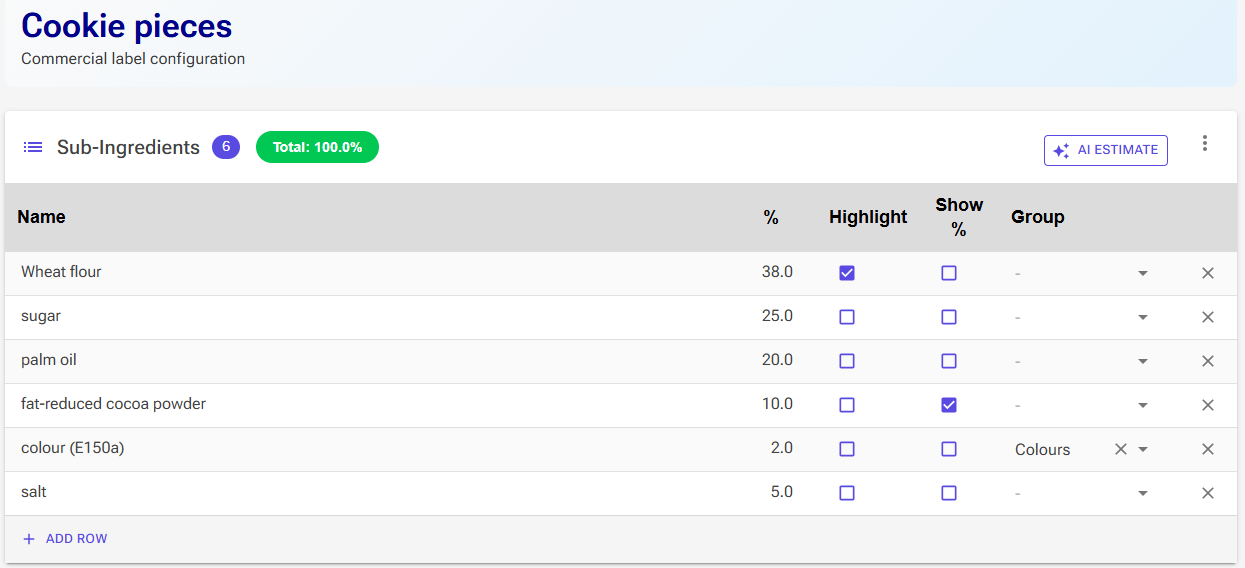
| Cookie pieces | wheat flour 40% (Highlight ✔), sugar 25%, palm oil 20%, … | WHEAT FLOUR, sugar, palm oil, … |
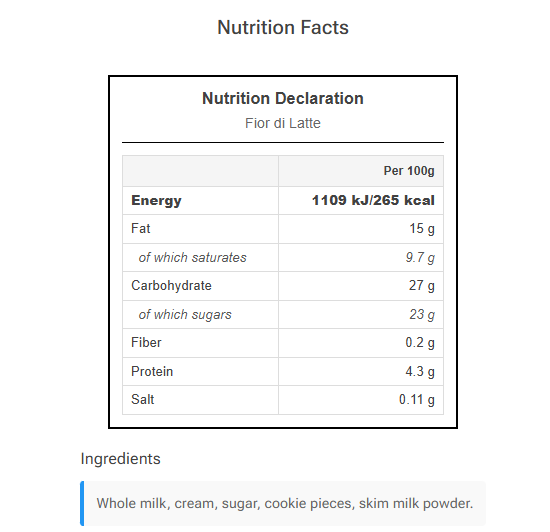
That single row earns its keep in two other ways. It lets you set the label name independently of your internal name — your ingredient can stay "Cream 40% UHT, Supplier X" in your library while the label simply says "cream". And because identical names are merged across the whole recipe, the cream from this row and the cream inside your caramel breakdown are added together into one correctly-positioned entry.
Tip: When names merge, highlighting is inherited. If any row contributing to a merged entry has Highlight ticked, the merged entry is highlighted. Ticking it on your base "cream" ingredient covers you even if you forget it inside a compound breakdown somewhere.
Two Ways to Handle a Compound Ingredient
There are two approaches, and they solve different problems. You can use either one, and you can mix them freely across your ingredient library.
Approach 1: Full Breakdown with Percentages
List each component as its own sub-ingredient row with its percentage of the parent ingredient. A house-made caramel might be sugar 45%, cream 40%, butter 15%.
Use this when you know the composition — it is your own preparation, or the supplier declares percentages on the pack. It is the more powerful option, and it is what everything else in this article is built around:
- Components are merged across the whole recipe. If sugar arrives from your caramel, your cookie pieces, and the base itself, all three amounts are added together and declared once, in the right position in the list.
- Each component is sorted individually by its true weight in the finished product.
- You can highlight and percentage-declare each component separately.
Approach 2: The Parenthetical Single Line
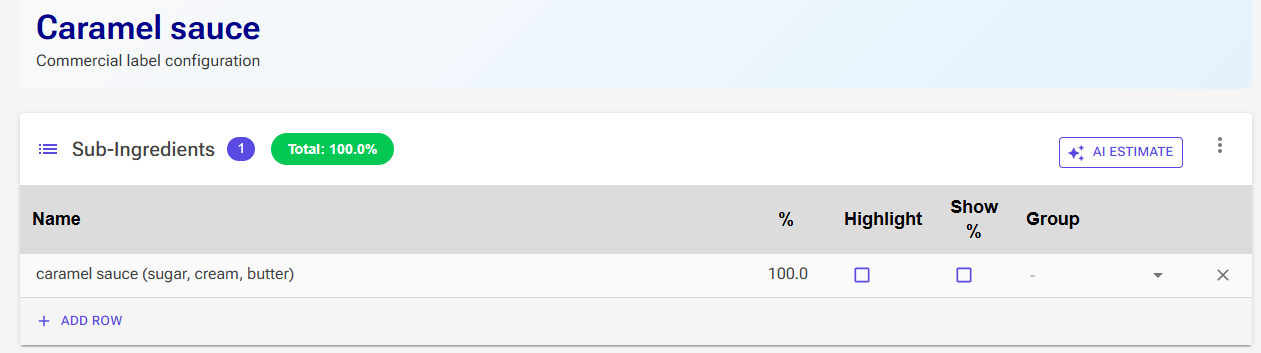
Enter the whole compound as one sub-ingredient row at 100%, writing the components in brackets inside the name:
Name: caramel sauce (sugar, cream, butter)
%: 100
The name is printed exactly as you type it. Use this when you genuinely do not know the internal percentages — a bought product that lists its components but no numbers.
Be aware of the trade-offs:
- The block is treated as one single item. It is positioned in the list by the parent ingredient's total weight, not by its components.
- Sugar inside this block is not merged with sugar from anywhere else in the recipe.
- Ticking Highlight puts the entire line in bold uppercase, brackets and all. To emphasise just one component, type it in capitals yourself inside the name — for example
caramel sauce (sugar, CREAM, butter)— and leave Highlight unticked. The text prints verbatim, though it will not be bold.
Tip: Start with Approach 2 to get a usable label quickly, then upgrade your most important compound ingredients to Approach 1 over time. A rough percentage estimate that lets the app merge and sort correctly is usually better than a bracketed block that cannot.
Step 1: Define Your Allergens and Groups
Before you can assign allergens to ingredients, you have to tell the app which allergens exist. This is a one-time setup, and it is deliberately your own list rather than a fixed one — so you can name each allergen exactly as it should appear on your labels, in your own language.
Go to Settings and click Advanced Ingredient Settings, or navigate directly to /settings/ingredients. You need to be logged in; the page is not available to guest users.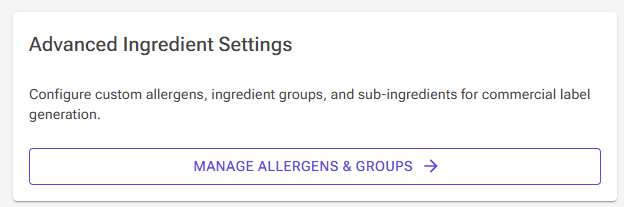
The Fast Way: Standard Allergen Templates
You do not have to build the list from scratch. The Set up standard allergens… button at the top of the page fills your allergen and group lists from a built-in template based on actual food labeling legislation, in the language your labels use.
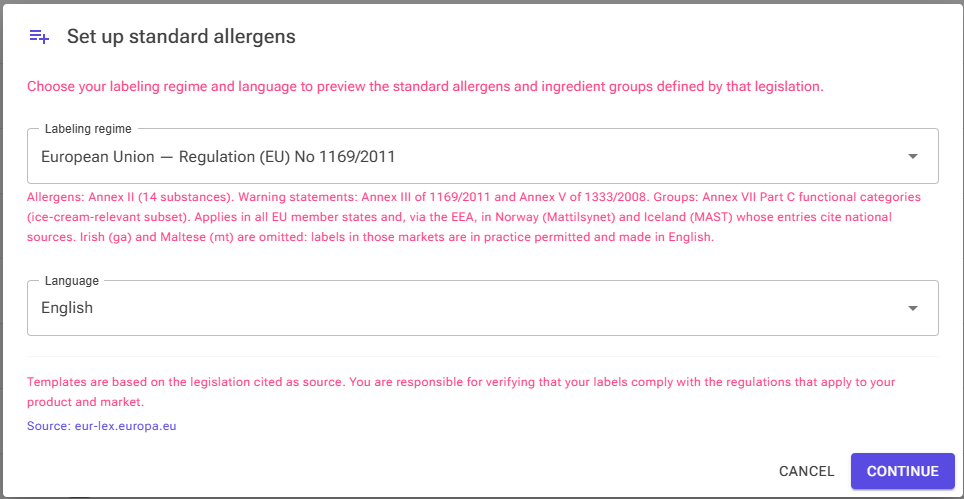
The dialog has two steps. First you choose:
- Labeling regime — the legislation your market follows. Ten regimes are currently built in (see the table below). When you pick one, a short note under the dropdown summarises the legislation and any special rules for that market — for example, that Canadian labels must be bilingual.
- Language — the wording the entries are created in. The dropdown lists the languages available for the chosen regime; a regime with only one language selects it automatically. Pick the language your labels are printed in — the names go onto your labels verbatim.
| Regime | What the template contains | Languages |
|---|---|---|
| Australia / New Zealand — FSANZ Plain English Allergen Labelling (PEAL) | The prescribed plain-English allergen names from Schedule 9, with each of the nine tree nuts declared individually and molluscs separate from crustacea. | English |
| Brasil — ANVISA RDC 26/2015 / RDC 727/2022 | The Brazilian allergen list — tree nuts individually, plus natural latex — and the mandatory statements, including the "Contém Glúten" / "Não Contém Glúten" declarations. | Português (Brasil) |
| Canada — Health Canada / CFIA priority allergens | The 11 priority allergen categories (including mustard, sulphites and molluscs), with the specific tree nut named. Canadian labels must be bilingual — apply the template in both languages and maintain both declarations. | English, Français |
| Codex Alimentarius — International Baseline (CXS 1-1985) | The FAO/WHO baseline allergen list that most national laws derive from. Use it when no curated regime exists for your market, then verify your national requirements — many countries add further allergens. | English, Español, Français |
| European Union — Regulation (EU) No 1169/2011 | The 14 Annex II allergens, the mandatory warning statements from EU food law (azo colours, "with sweetener(s)", the aspartame phenylalanine statement, the polyols laxative statement, liquorice) as ready-made Special Warnings, and the Annex VII functional categories as groups. | 24 languages — every official EU language except Irish and Maltese (labels in those markets are in practice made in English), plus Norsk (bokmål) and Íslenska for the EEA markets |
| México — NOM-051-SCFI/SSA1-2010 (mod. 2020) | The Codex-style Mexican list — including sulphites at 10 mg/kg or more — in Mexican Spanish terms (cacahuate, soya). | Español (México) |
| Türkiye — Türk Gıda Kodeksi (TGK) Etiketleme Yönetmeliği | The Turkish Food Codex list, which mirrors the EU's 14 allergen categories and equivalent statements, in Turkish statutory names. | Türkçe |
| United Kingdom — assimilated Regulation (EU) No 1169/2011 (FSA) | The same 14 allergens and mandatory statements as the EU — the UK retained the EU food information rules after Brexit. | English |
| United States — FALCPA / FASTER Act | The 9 major allergens (the FALCPA eight plus sesame, added by the FASTER Act), plus the FDA phenylketonurics and sorbitol statements as Special Warnings. The groups here are convenient label-writing categories rather than statutory names, since the FDA does not mandate a category list. | English |
| 日本 — 食品表示基準(消費者庁)/ Japan (CAA) | The mandatory 特定原材料 allergens, plus the roughly twenty recommended 特定原材料に準ずるもの entries, which are offered unticked so you decide which to declare. | 日本語 |
Note: More regimes and languages are added over time, so the dropdowns in the app may offer more than this table shows.
Step two shows exactly what the template contains, as a checklist. Every row is marked either Will create or Already exists — the template compares by name, ignoring capitalisation, so entries you already have are recognised and locked out of the selection. The defaults are deliberate:
- Allergens not already in your list are pre-ticked — on most labels you want all of them available. The exception is allergens that are recommended rather than mandatory in their regime (such as Japan's recommended list): these carry a Recommended chip and are offered unticked, so you opt into the ones you want to declare.
- Warning statements appear under their own heading between the allergens and the groups, and are pre-unticked, because they only apply to specific products — tick the ones your range actually needs, or add them later by re-running the template.
- Groups: every regime ships the same set in its own language. The categories common in ice cream (Emulsifier, Stabiliser, Thickener, Colour, Preservative, Acid) are pre-ticked; the rarer ones (Antioxidant, Gelling agent, Acidity regulator, Sweetener, Flavour enhancer, Humectant, Anti-caking agent, Modified starch) are offered unticked.
.
Clicking Apply adds the ticked entries to your lists. The template only ever adds: it never renames, changes or removes anything you already have, so it is always safe to run — including on a list you have been maintaining by hand for years, and as often as you like. After applying, the entries are ordinary allergens and groups, fully yours to rename, merge or delete like any other.
Important: The templates are built from the legislation cited as their source — the dialog links to it — but you remain responsible for verifying that your labels comply with the regulations that apply to your product and market.
The two sections that follow describe the entries themselves and how to manage them by hand — which is also how you add anything the template does not cover.
Allergens
Click the + button in the Allergens card header to add one. Each allergen has just two fields:
- Name — the text that will be printed. Write it exactly as it should appear on the label, including capitalisation.
- Special Warning — a toggle that changes what kind of entry this is (see below).
A normal allergen is one you assign to ingredients with Contains or Traces, and it ends up in the collected "Contains:" and "May contain:" statements. Typical entries: milk, eggs, wheat, hazelnuts, soya, almonds.
Turn Special Warning on for text that is not an allergen at all, but a standalone regulatory statement — for example "Contains azo dyes that may have an adverse effect on activity and attention in children." These behave differently:
- They are marked with a Warning chip in the list and appear under a separate Warnings heading when you assign them.
- They have no Contains/Traces choice — assigning one to an ingredient is enough.
- They are printed as their own separate statement, not merged into the Contains or May contain lists.
Tip: Because the Name field holds the full sentence, a Special Warning can be as long as you need — up to 500 characters. The regime templates already include the most common statutory warning statements for their market, ready to tick.
Ingredient Groups
Groups let you pull a set of sub-ingredients out of the main declaration and print them as their own line. This is how you produce declarations such as:
Ingredients: cream, sugar, skimmed MILK powder, glucose syrup, stabiliser.
Colours: E160a, E120.
Preservatives: potassium sorbate.
Add groups in the second card — typical names are Colours, Preservatives, Flavourings, Emulsifiers, Acidity regulators. You then assign individual sub-ingredient rows to a group in Step 2. Anything left unassigned stays in the main ingredient list.
Groups are listed alphabetically in generated reports, so name them with that in mind if the order matters to you.
Managing the Lists
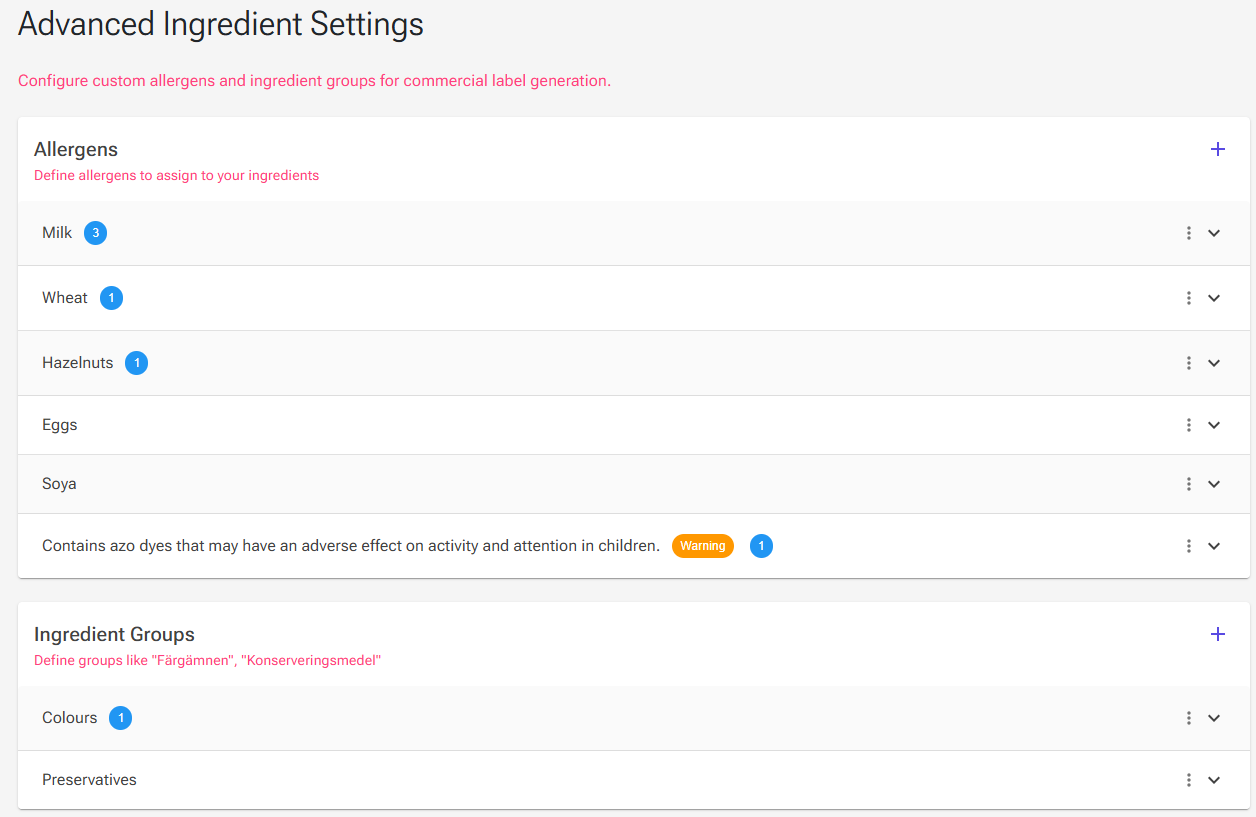
Both cards behave the same way. Each entry shows a blue usage count chip — how many ingredients use that allergen, or how many sub-ingredients use that group. Click an entry to expand it and see exactly which ones:
- For an allergen, you get the ingredient names with red Contains or orange Traces chips.
- For a group, you get the parent ingredient plus the sub-ingredient name and its percentage.
The edit (pencil) icon next to each row opens that ingredient's Sub-Ingredients & Allergens editor right on top of the page, and the lists refresh when you close it. This makes the expanded view a practical audit tool: expand "milk", and you are looking at every ingredient in your library that declares it — one click away from correcting any of them.
The ⋮ menu on each entry offers three actions:
- Edit — rename it, or change the Special Warning toggle. The new name applies everywhere immediately, including on labels you generate afterwards.
- Merge into… — moves every reference to another entry, then removes this one. Use it when you discover you created both "milk" and "Milk". Only appears when you have more than one entry.
- Delete — asks for confirmation and tells you how many references will be affected. Deleting an allergen removes it from every ingredient that used it; deleting a group leaves its sub-ingredients in place but ungrouped, so they fall back into the main ingredient list.
Tip: Keep the allergen list short and canonical — one entry per allergen you actually declare. Duplicates such as "milk" and "milk powder" produce two separate lines in your Contains statement. The template never creates duplicates of its own entries, but it cannot know that your hand-written "Milk products" means the same as its "Milk" — use Merge into… to consolidate.
Step 2: Set Up Each Ingredient
With your allergens and groups defined, you can start configuring ingredients. Open an ingredient from the Ingredients page, go to the Tools tab, and click the Sub-Ingredients & Labeling card. If the ingredient already has some data, there is a faster route: the Ingredient List & Allergens preview card on the Nutrition tab has an Edit Sub-Ingredients & Allergens button that opens the same editor. And as described above, the edit icons on the Advanced Ingredient Settings page open it too.
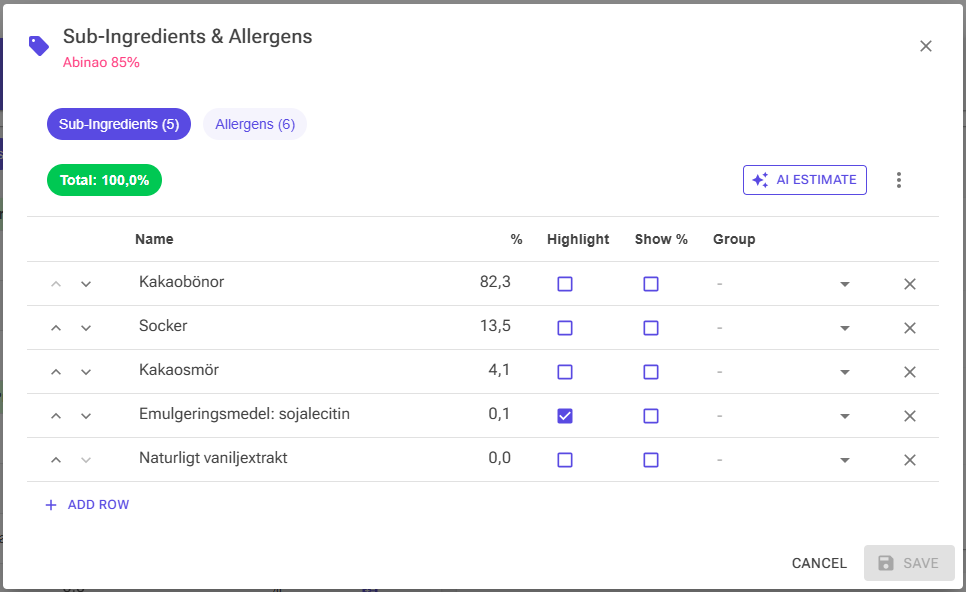
The editor opens as a dialog on top of whatever page you are on. Two chips at the top switch between its sections — Sub-Ingredients and Allergens — each showing a count of what the ingredient has.
Your edits are a draft: nothing is stored until you click Save. The Save button stays disabled until you change something, and closing or cancelling with unsaved changes asks whether to discard them. That makes the editor a safe place to experiment — rearrange, re-estimate, clear everything — and back out with Cancel if you do not like the result.
The Sub-Ingredients Table
Click Add Sub-Ingredient (or Add Row once you have some) and fill in the columns:
| Column | What it does |
|---|---|
| Name | The text printed on the label. Type it in lower case as it should appear in a running ingredient list — the app handles capitalising the first ingredient and uppercasing highlighted ones. |
| % | This component's share of this ingredient — not of the recipe. The app converts it to a recipe percentage later. |
| Highlight | Prints this component in bold uppercase. Tick it for allergens. |
| Show % | Appends the calculated recipe percentage after the name, e.g. "hazelnuts (12%)". Use it for components you make a claim about on the pack. |
| Group | Moves this component out of the main list and into one of your groups, such as Colours. Leave it empty for normal ingredients. |
Highlighted rows are shown in bold uppercase in the table itself, so you can see at a glance what will stand out on the label. The up/down arrows at the start of each row reorder the list — useful for keeping a long breakdown organised while you work; the printed declaration is ordered by calculated weight regardless. The × at the end of a row deletes it, and the ⋮ menu in the toolbar has Sort by percentage to arrange the rows largest-first, plus Clear All if you want to start over.
The Total Chip
The chip in the toolbar adds up your percentages and colours itself accordingly:
- Green — between 99.5% and 100.5%. Your breakdown accounts for the whole ingredient.
- Orange — below 99.5%. Something is missing, or you have only entered the components you know about.
- Red — above 100.5%. The percentages overlap or were double-counted somewhere.
Treat it as a sanity check rather than a hard requirement. The app normalises whatever you enter to 100% when it builds the declaration, so an incomplete breakdown still produces a usable list — the proportions between your components are simply preserved and scaled up. Green is still the goal, because it means the proportions reflect reality.
AI Estimate
Typing out a bought product's breakdown is tedious, and the percentages are rarely printed. The AI Estimate button in the toolbar reads a product's declared ingredient list and estimates the percentages for you. This is a Premium feature.
In the dialog you provide:
- Ingredient list (required) — paste the declaration from the packaging, exactly as printed.
- Nutrition per 100g (optional) — fat, carbohydrates, sugars, protein, salt and fibre. Supplying these improves accuracy considerably, because the estimate has to add up to the known nutrition.
- Product declarations (optional) — legally declared figures such as cocoa %, cocoa fat %, milk fat % or fruit %. These are treated as hard constraints rather than hints.
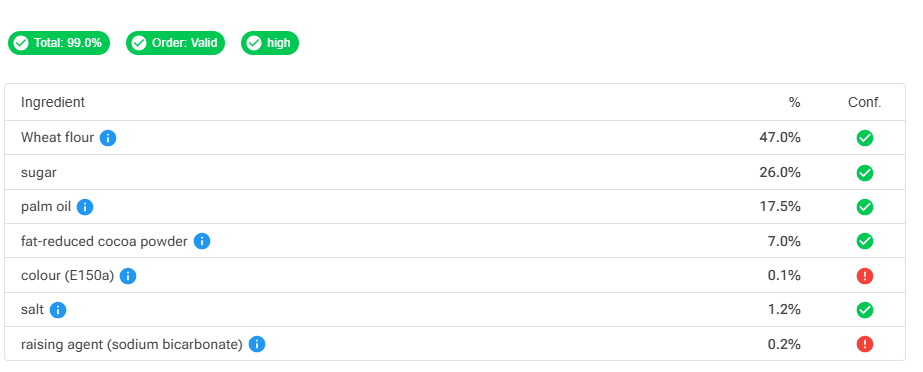
The result comes back as a table with a percentage and a confidence indicator per row, plus two checks: the Total percentage, and whether the Order is valid — that is, whether the estimated amounts still run in the descending order the original declaration implies. You can adjust your inputs and Re-estimate as often as you like.
Warning: Clicking Apply replaces every existing sub-ingredient row in the editor (it asks first if you have any). The replacement is still only a draft — Cancel the editor and your old rows survive — but once you Save, they are gone. Run AI Estimate first, then refine by hand — not the other way round.
Always review what comes back. An estimate is a well-informed guess at a manufacturer's recipe, and you are the one responsible for what the label says.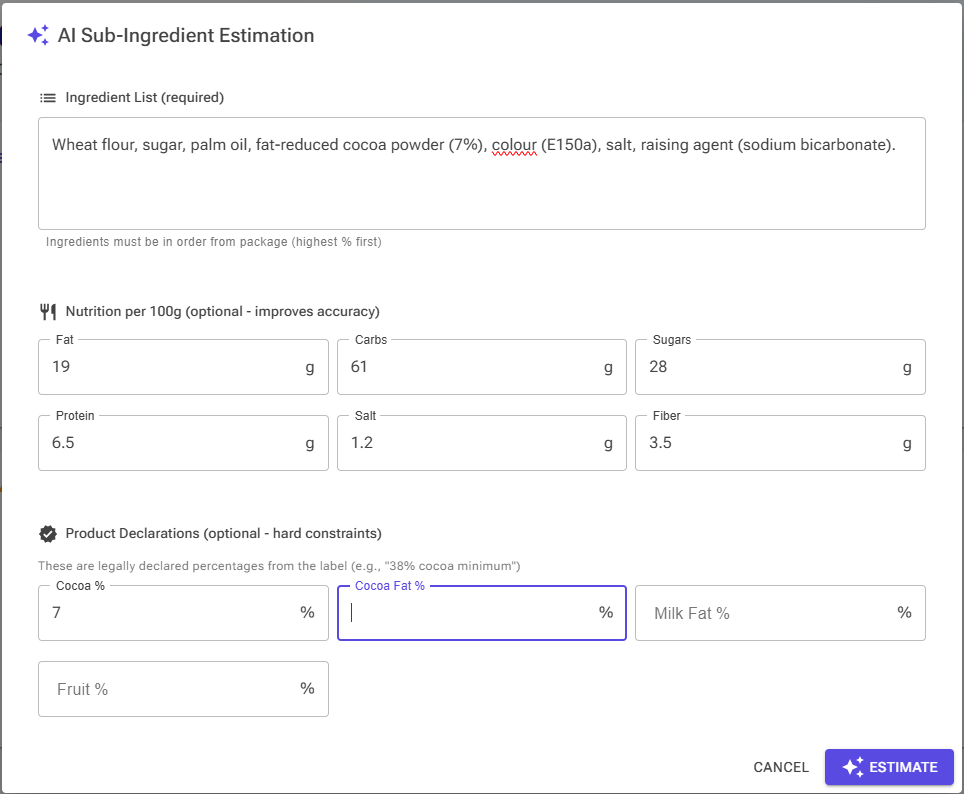
Assigning Allergens
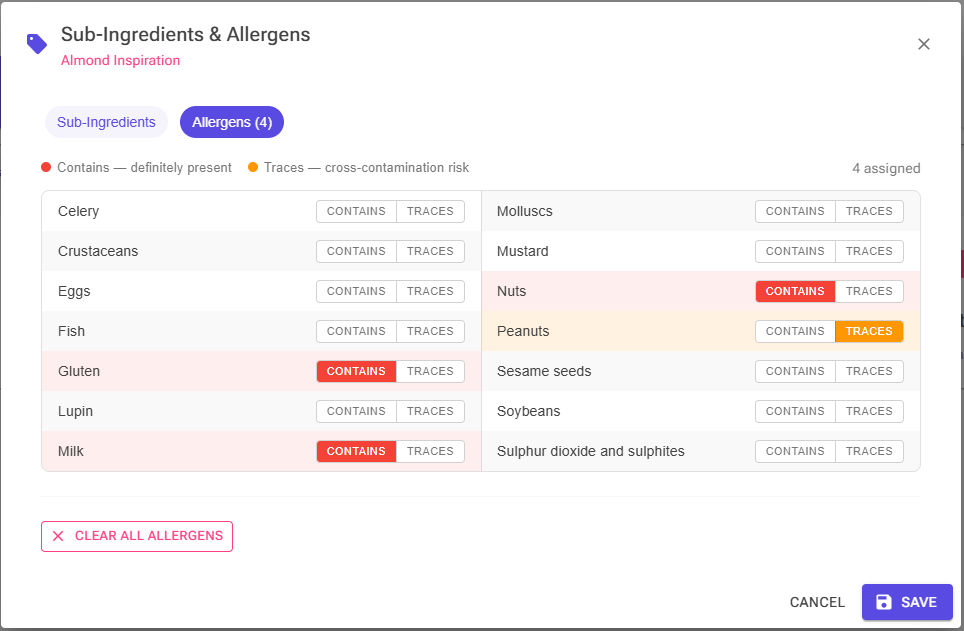
Switch to the Allergens section of the dialog. It works from the list you built in Step 1 — if you have not defined any allergens yet, it shows a Configure Allergens button that takes you to the settings page instead.
Every allergen appears as a clickable chip, in up to three areas:
- Contains — the allergen is definitely present. Click a chip to toggle it; selected chips fill red. Collected into the "Contains:" statement.
- May contain traces — possible cross-contamination. Selected chips fill orange. Collected into the "May contain:" statement.
- Warnings — your Special Warning entries, shown only if you have any. Selecting one attaches that standalone statement to the ingredient — there is no Contains/Traces distinction for these.
Contains and Traces are mutually exclusive: selecting an allergen in one area automatically deselects it in the other. An allergen is either present or it is not. A Clear all allergens button appears below the chips once anything is assigned — and like everything else in the dialog, none of it is saved until you click Save.
Important: Assigning an allergen here does not highlight anything in the ingredient list. The two systems are independent: allergen assignments produce the Contains and May contain statements, while the Highlight checkbox on a sub-ingredient row produces the bold uppercase text inside the declaration. A properly labelled ingredient usually needs both — tick Highlight on the "milk" sub-ingredient row and select your "milk" allergen under Contains.
How Your Declaration Is Calculated
You never assemble the ingredient list yourself. Whenever a label, recipe card or report is generated, the app rebuilds the whole declaration from your recipe. Understanding the steps makes it obvious why the output looks the way it does.
A Worked Example
Take a 1000 g mix built from five ingredients, with sub-ingredients set up as described above:
| Recipe ingredient | Weight | Its sub-ingredient rows |
|---|---|---|
| Whole milk | 400 g | milk 100% (Highlight ✔) |
| Cream 40% | 300 g | cream 100% (Highlight ✔) |
| Sugar | 150 g | None |
| Skimmed milk powder | 50 g | skimmed milk powder 100% (Highlight ✔) |
| Cookie pieces | 100 g | wheat flour 40% (Highlight ✔), sugar 25%, palm oil 20%, cocoa powder 10%, salt 5% |
The cookie pieces are 10% of the mix, so their components enter at a tenth of their internal percentages: wheat flour at 4%, sugar at 2.5%, palm oil at 2%, cocoa powder at 1%, salt at 0.5%. That cookie sugar is then added to the 150 g of plain sugar, giving 17.5% in total. Sorted by weight, the result is:
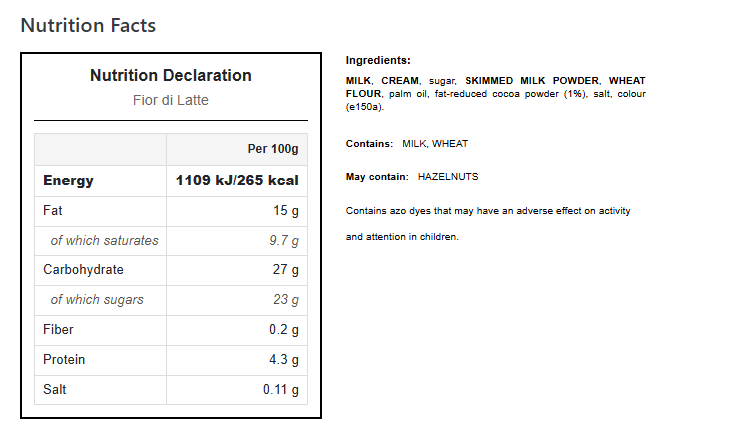
MILK, CREAM, sugar, SKIMMED MILK POWDER, WHEAT FLOUR,
palm oil, cocoa powder, salt.
Note what happened to the sugar: it moved up the list because two sources were combined. That repositioning is exactly what a correct declaration requires, and it is the main practical reason to prefer a full percentage breakdown over a bracketed block.
The Steps in Detail
- Normalisation. Each ingredient's sub-ingredient rows are scaled so they total 100%. If your rows add up to 80%, every row is scaled up by a quarter; the proportions between them are what matters.
- Weighting. Each row is multiplied by its parent ingredient's share of the total mix weight. An ingredient with no rows at all enters once, under its own name, at its full share.
- Merging. Rows with the same name are combined into one entry and their percentages added together. Matching ignores capitalisation, so "Sugar" and "sugar" merge. If either contributor has Highlight or Show % ticked, the merged entry inherits it.
- Sorting. Everything is sorted by final percentage, highest first. Rows assigned to a group are pulled out of the main list and printed on their own group line.
- Formatting. Highlighted entries become bold uppercase. If the very first entry is not highlighted, its first letter is capitalised instead. Show % entries get their percentage appended, rounded to a whole number. Entries are comma-separated and the list ends with a full stop.
Warning: Merging is by exact text, not by meaning. "cream" and "Cream 40%" are two different entries and will both appear on your label. Decide on one spelling per component and reuse it everywhere — this is the most common cause of a declaration that lists the same thing twice.
Details Worth Knowing
- Evaporation concentrates the nutrition values, but not the ingredient percentages. If you cook a mix down, the nutrition declaration is scaled to the finished weight — fat, sugars, salt and everything else rise accordingly. The ingredient percentages are not scaled: they describe the mix as you weighed it out. The ordering is identical either way, since every component would scale by the same factor. Worth knowing if you cook down heavily and use Show % to make a quantitative claim on the pack.
- Infusions are handled separately. An ingredient marked as an infusion is steeped and removed, so it contributes no weight to the calculation. It is still appended to the end of the ingredient list under its own name — and its allergens still count, because an infused ingredient can absolutely trigger an allergy.
- Rounding is to whole numbers. A Show % component below 0.5% will display as "(0%)". Reserve the option for components substantial enough to be worth declaring.
- Allergens merge across the whole recipe. Every ingredient's assignments are collected together, and Contains wins over Traces. If one ingredient declares milk as Contains and another as Traces, milk appears only in the Contains statement — the stronger declaration always takes precedence.
- There is a fallback. If no ingredient in the recipe has any sub-ingredients, the app lists your ingredient names in descending weight order instead. It stays useful, but nothing is highlighted or merged.
Where Your Declaration Appears
The same calculation feeds every output, so a change to a sub-ingredient row shows up everywhere at once. There is nothing to regenerate or refresh.
The Ingredient Preview Card
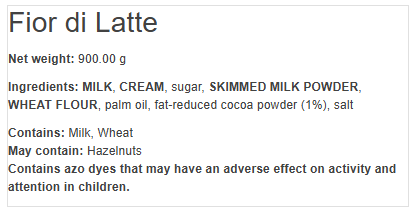
On the Edit Ingredient page, an Ingredient List & Allergens card appears below the Nutrition Facts card as soon as an ingredient has sub-ingredients or allergens. It shows that single ingredient's declaration — the ingredient line, any group lines, and its Contains, May contain and Other warnings statements.
This is the quickest way to check your work while setting an ingredient up, and the Edit Sub-Ingredients & Allergens button at the bottom opens the editor dialog straight from the card.
Nutrition Labels and Recipe Cards
Open the Nutrition Label for a recipe and you get the finished declaration for the whole mix, below the label itself: the ingredient list with allergens in bold uppercase, followed by the Contains and May contain statements collected from every ingredient in the recipe.
Recipe Cards use exactly the same declaration, so a card you hand to staff or a customer carries the same list as the label on the tub.
Recipe Sets and Reports
A Recipe Set combines several recipes into one product — a base plus a ripple plus an inclusion, or a whole box of different items. Its Summary panel shows the merged declaration for the combined product, calculated across every included recipe with the same rules. This is where you go for anything sold as an assembled product rather than a single mix.
For printable output, generate a report from a template. Templates pull the declaration in through tags, which lets you place each part exactly where your label artwork needs it:
| Tag | What it produces |
|---|---|
{{Recipe.IngredientsFormatted}} |
The main ingredient list, with highlighting and percentages applied. Grouped items are excluded. |
{{Recipe.Ingredients}} |
A plain list with no formatting at all — and it includes grouped items. Useful for internal documents, not for labels. |
{{Recipe.Ingredients_GroupName}} |
One tag per group, formatted like the main list. Spaces are stripped from the group name, so "Acidity regulators" becomes {{Recipe.Ingredients_Acidityregulators}}. |
{{Recipe.UserContains}} |
Your allergens marked as Contains, comma-separated. |
{{Recipe.UserTraces}} |
Your allergens marked as Traces. |
{{Recipe.UserOtherWarnings}} |
Your Special Warning statements. |
{{Recipe.Contains}} / {{Recipe.MayContain}} |
The built-in allergen list instead of your own — see the next section. |
Every one of these also exists on the RecipeSet table for combined products, for example {{RecipeSet.IngredientsFormatted}}.
Warning: If you use groups, a template built only on
{{Recipe.IngredientsFormatted}}will silently omit your grouped items — your colours and preservatives disappear from the label. Add a tag for each group, and wrap it so the line only prints when that group is present:
{{#IF:Recipe.Ingredients_Colours}}<p>Colours: {{Recipe.Ingredients_Colours}}</p>{{/IF:Recipe.Ingredients_Colours}}
The supplied default templates already include the ingredient and allergen tags, so the simplest path is to start from one and adjust it. See HTML Reports for the full template syntax and Recipe Sets & Labels for working with combined products.
The Two Allergen Systems
Ice Cream Calculator has a second, simpler allergen feature that predates the one described here, and it is easy to end up using both by accident. It is worth knowing which is which.
The built-in system lives on the Properties tab of the Edit Ingredient page: two rows of chips, Contains (Definite) and May Contain, covering a fixed set of fifteen allergens — milk, eggs, tree nuts, peanuts, gluten, soya, fish, shellfish, sesame, mustard, celery, lupin, molluscs, sulphites and coconut. You click a chip to toggle it, and an allergen cannot be in both rows at once.
The custom system is the one this article covers: your own allergen list, assigned in the Sub-Ingredients & Allergens editor.
| Built-in | Custom | |
|---|---|---|
| Set up on | Properties tab, chips | Advanced Ingredient Settings, then per ingredient |
| Which allergens | A fixed list of fifteen | Anything you define — from a legal template or by hand |
| Wording | Fixed English names | Your own, in any language |
| Free-text warnings | Not available | Yes, via Special Warning |
| Report tags | Contains, MayContain |
UserContains, UserTraces, UserOtherWarnings |
Pick One
Both systems are collected independently and both are printed. If milk is ticked as a built-in allergen and assigned as your own "milk" allergen, it is declared twice — several of the default report templates print the built-in list as "Contains:" and yours immediately below as "Also contains:". On a commercial label that looks like a mistake, because it is one.
So choose one system per ingredient library and apply it consistently:
- Use the built-in system if you label in English, the fifteen standard allergens cover you, and you want the least possible setup.
- Use the custom system if you label in another language, need particular wording, need statements outside the standard list, or need free-text regulatory warnings.
For most commercial labelling the custom system is the better fit — the standard allergen templates give you a legally grounded starting list in your language in under a minute, and if you are setting up sub-ingredients for highlighting anyway, you are already working in the editor where allergens are assigned, so it costs you almost nothing extra.
Tip: Switching from built-in to custom? Clear the chips on the Properties tab as you go, or you will get doubled statements. If clearing them all is impractical, the alternative is to edit your report template to use only the
User…tags — but then the built-in data lingers in the background and may resurface in an output you did not adjust.
⚠️ None of the shared library ingredients have built-in allergen flags set, so neither system arrives pre-filled — you assign allergens yourself either way.
Troubleshooting
Problem: Nothing appears in bold, even though I have assigned allergens to my ingredients.
Solution: Allergen assignments and highlighting are separate mechanisms. Assignments produce the Contains and May contain statements; highlighting comes from the Highlight checkbox on a sub-ingredient row. Add a row to the ingredient — its own name at 100% is enough for a simple ingredient such as cream — and tick Highlight.
Problem: My label shows an internal name like "Cookie crumbs, Supplier X" instead of what the cookies are made of.
Solution: That ingredient has no sub-ingredient rows, so the app has nothing to declare but the ingredient's own name. Break it down, or at minimum add one row with the label wording you want at 100%.
Problem: I can't add labeling data to an ingredient from the standard library.
Solution: Sub-ingredients and allergens belong to your own personal ingredients. Use the Convert to Personal Ingredients tool to turn the standard ingredients in your recipes into personal ones, then set up their labeling.
Problem: The same thing is listed twice, for example "cream" and "Cream 40%".
Solution: Entries merge on exact text, so two spellings stay separate. Settle on one wording per component and use it in every ingredient that contains it. The same applies to allergen statements — if an allergen appears twice, you are probably using both allergen systems at once.
Problem: A percentage looks far too low.
Solution: The % column is a component's share of that ingredient, not of the recipe. A cookie that is 40% wheat flour, used at 10% of the mix, correctly contributes 4% wheat flour to the finished product.
Problem: My Colours or Preservatives line is missing from a generated report.
Solution: {{Recipe.IngredientsFormatted}} deliberately leaves out grouped items so they are not declared twice. Add a tag for each group to your template, such as {{Recipe.Ingredients_Colours}}, and remember that spaces are stripped from the group name.
Problem: My Contains statement is empty even though I created allergens in Settings.
Solution: Creating an allergen — by hand or from a template — only adds it to your list; it does nothing until you assign it to ingredients. Open Advanced Ingredient Settings and check the usage count next to each allergen; a count of zero means it is not in use anywhere. If the counts look right, check that your template uses {{Recipe.UserContains}} rather than {{Recipe.Contains}}.
Problem: I ran the standard allergen template but some entries didn't get created.
Solution: Rows marked Already exists are skipped because an entry with that name is already in your list, and warning statements plus the less common groups are unticked by default. Reopen the dialog and tick the ones you want — running it again is always safe.
Problem: AI Estimate replaced the sub-ingredients I had entered by hand.
Solution: Applying an estimate replaces every existing row in the editor. If you have not saved yet, click Cancel and your previous rows are untouched. Once saved, they are gone — so run AI Estimate first and refine the result afterwards, rather than the other way round.
Problem: An ingredient appears at the very end of the list, out of weight order.
Solution: Ingredients marked as infusions are steeped and removed, so they carry no weight to sort by. They are appended to the end of the declaration on purpose.
Related Articles
- Convert to Personal Ingredients — turning the standard ingredients in your recipes into personal ones you can label.
- Ingredients — managing your ingredient library and the Edit Ingredient page.
- HTML Reports — template syntax, tags and building your own label layouts.
- Recipe Sets & Labels — combining recipes into one product and generating its label.
- Recipe Cards — the other place your declaration is printed.