The HTML Report System lets you create professional reports, labels, and specification sheets from your recipes and ingredients. Using customizable templates with a simple tag syntax, you can generate pick lists, nutrition labels, ingredient declarations, and more.
Whether you need to print product labels for commercial ice cream production or create a detailed specification sheet for a recipe, the report system gives you full control over the output format.
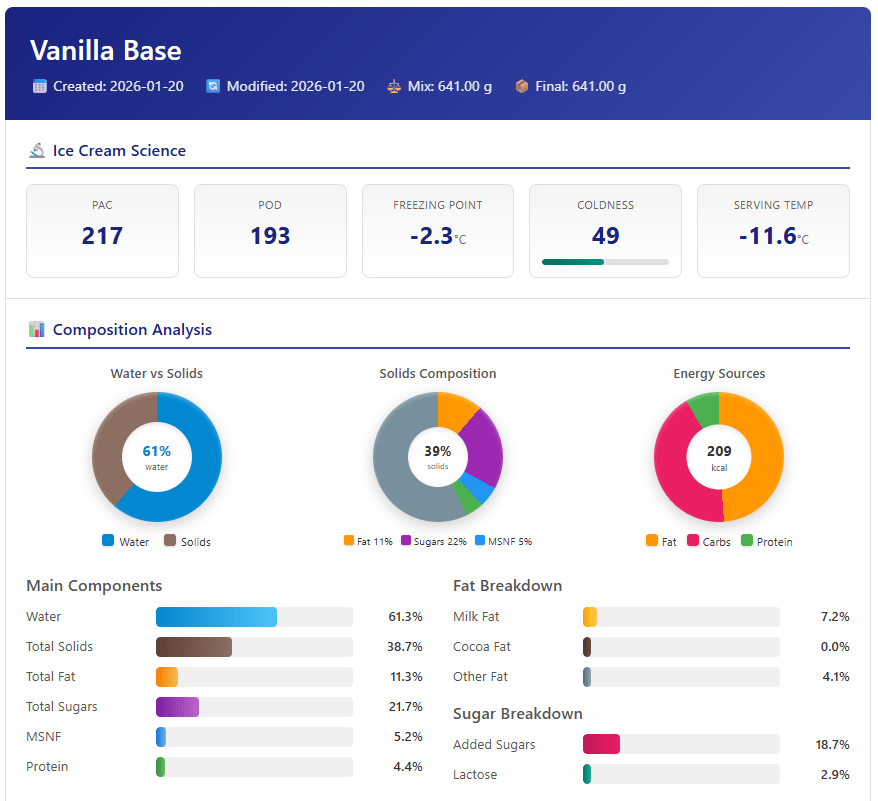
Where to Access Reports
Reports can be generated from several places in the application, depending on what data you want to include:
| Location | Report Type | Description |
|---|---|---|
| Recipes page | Recipe | Select a single recipe to generate a report for that recipe |
| Recipes page | Recipe (multiple) | Select multiple recipes to generate a combined report |
| Recipe Editor | Recipe | Generate a report for the recipe you’re currently editing |
| Ingredients page | Ingredient | Select a single ingredient for a detailed ingredient report |
| Ingredients page | Ingredient Comparison | Select multiple ingredients to generate a comparison table |
| Recipe Sets (Production) | Recipe Set | Generate pick lists, combined labels, or recipe cards for a production batch |
| Planning (Production) | Production | Generate a work order for a production day, including plans, ingredients, and containers |
| Product Definitions (opened from Planning or Stock) | Product | Generate product reports such as specification sheets and product labels |
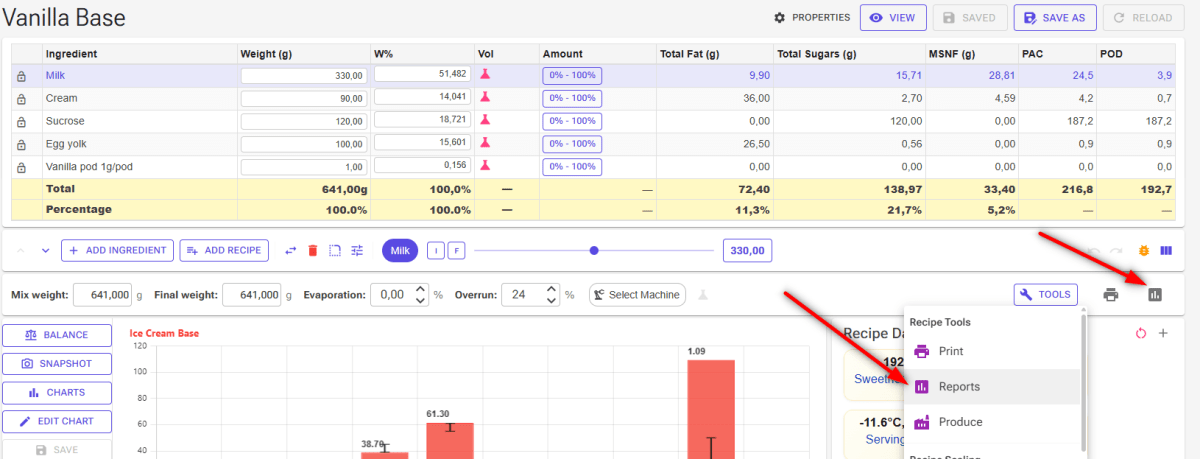
Generate Report Dialog
When you click to generate a report, the Generate Report dialog appears.
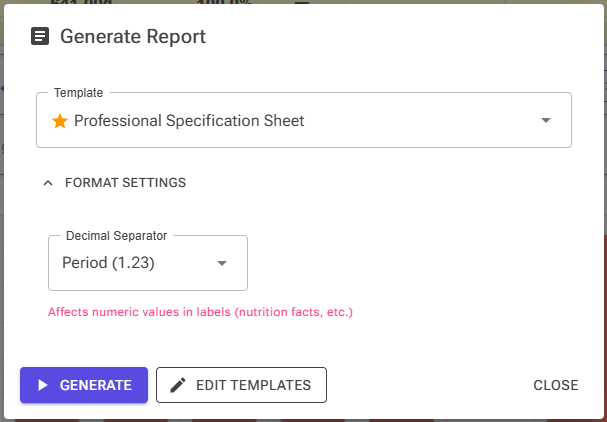
Template Selection Choose from available templates using the dropdown. Default templates provided by the system are marked with a ⭐ star icon. Your custom templates appear without a star.
Format Settings Click “Format Settings” to expand additional options:
- Decimal Separator: Choose between period (1.23) or comma (1,23) for numeric values. This is useful for different regional formats.
Actions
- Generate: Creates the report using the selected template and opens the result
- Edit Templates: Opens the Template Editor to create or modify templates
- Close: Closes the dialog without generating
The system remembers your last selected template for each report type.
Templates That Ask for Input
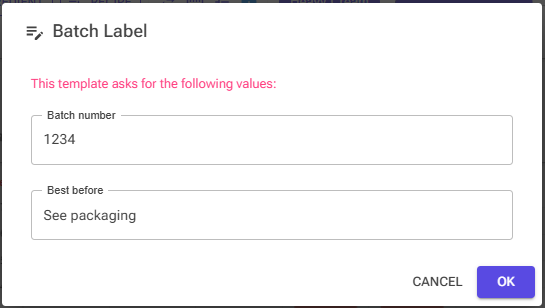
Some templates declare input fields (see User Input Fields below). When you click Generate with such a template, a small dialog first asks you to fill in the declared values – for example a batch number or a best-before date. The values you enter are remembered per template and pre-filled the next time. Clicking Cancel in the input dialog aborts the generation.
Templates With a Python Script
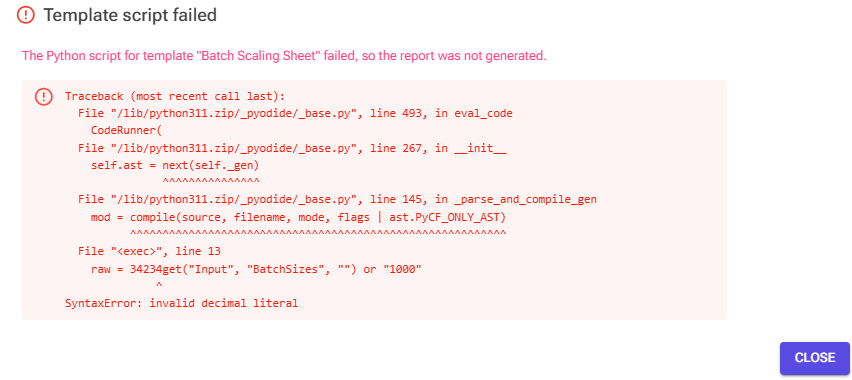
Templates can also carry an optional Python script that computes extra data before the report is rendered (see Python Template Scripts below). When you generate with such a template, a short “Running template script…” indicator appears. If the script fails, generation stops and a dialog shows the full Python error so you can fix the script – you never get a half-rendered report.
Note: Python template scripts are a Premium feature. Generating with a scripted template requires a Premium subscription; templates without scripts are unaffected.
Report Output
After generating a report, the result dialog displays your rendered report with several output options:
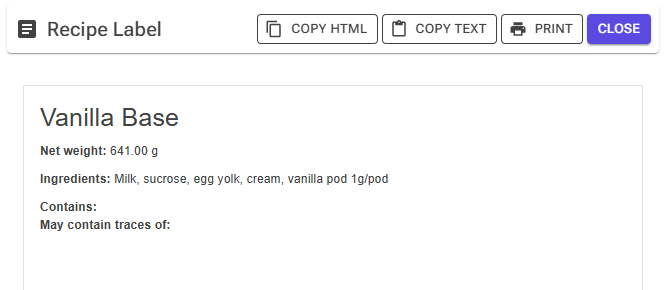
- Copy HTML: Copies the formatted HTML to your clipboard. Paste into Word, email clients, or other applications that support rich formatting.
- Copy Text: Copies a plain text version with HTML tags removed.
- Print: Opens your browser’s print dialog. The report opens in a new window optimized for printing.
- Close: Returns to the previous screen.
Tip: When pasting HTML into Word or Google Docs, use “Paste” (not “Paste as Plain Text”) to preserve formatting.
Template Editor
The Template Editor is where you create and customize your report templates. It provides a full HTML editor with tools to help you build templates without memorizing the tag syntax.
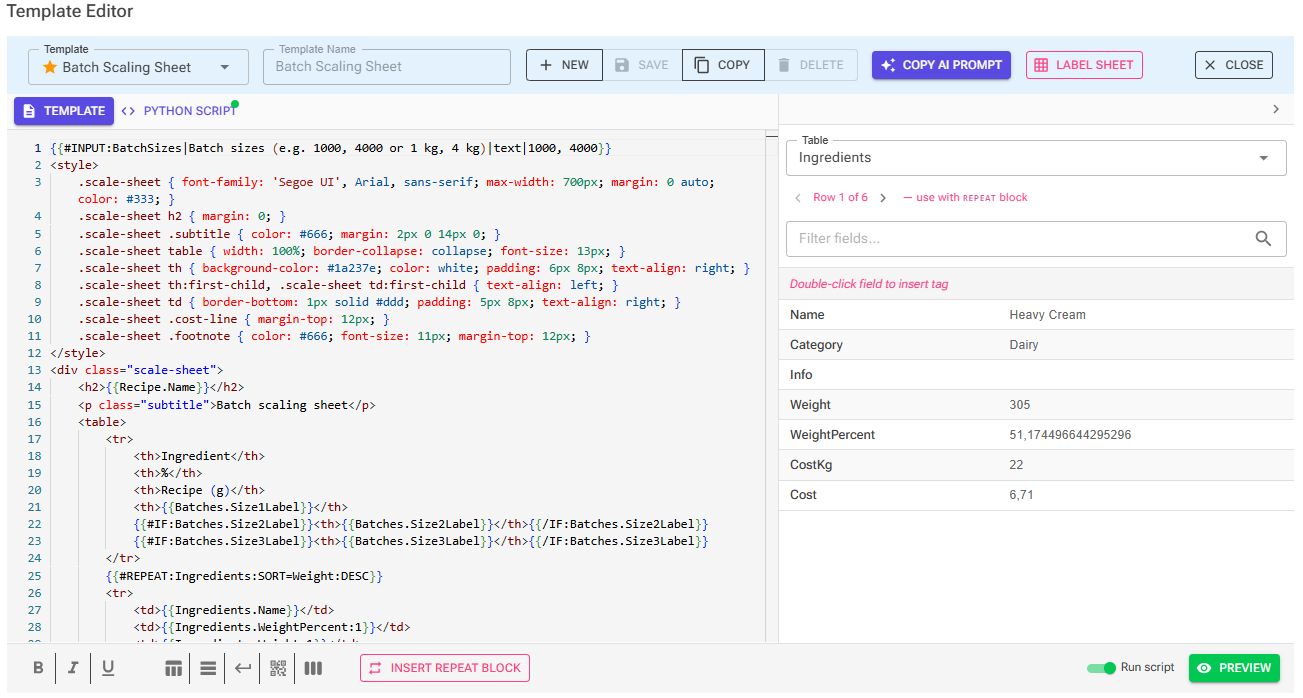
Editor Layout
Top Toolbar
- Template dropdown: Select which template to edit
- Template Name: Edit the name of your template (disabled for default templates)
- New: Create a new blank template
- Save: Save changes to the current template
- Copy: Create a copy of the current template (useful for customizing defaults)
- Delete: Delete the current template (cannot delete default templates)
- Copy AI Prompt: Copy a prompt you can use with external AI tools (see AI Template Generation below)
- Close: Close the editor and return to the previous screen
Left Panel – Template and Script Editors The editor area has two tabs:
- Template: A full-featured code editor (Monaco Editor) for your HTML template, with syntax highlighting, line numbers, undo/redo, and word wrap
- Python Script: A second code editor for the template’s optional Python script (Premium). A green dot on the tab shows at a glance that the current template has a script
Right Panel – DataSet Browser Browse all available data fields you can use in your template:
- Table dropdown: Switch between different data tables (Recipe, RecipeData, Ingredients, etc.)
- Filter field: Search for specific fields by name
- Field list: Shows field names and example values from your current data
- Double-click any field to insert its tag at your cursor position in the editor. On the Python Script tab, double-clicking inserts the Python accessor instead, e.g.
get("Recipe", "Name")
The panel can be collapsed using the arrow button to give more space to the editor.
Bottom Toolbar
- Formatting buttons: Bold, Italic, Underline – wraps selected text with HTML tags
- Insert buttons: Table structure, Table row, Line break
- Insert Repeat Block: Appears when viewing a multi-row table – inserts a REPEAT block template
- Run script: A switch shown when the template has a Python script – controls whether the script runs during Preview (on by default)
- Preview: Opens a preview of your template with real data. If the template declares input fields, the same input dialog as report generation appears first, so input-driven templates preview with real values

Template Syntax Reference
Templates use a mustache-style tag syntax with double curly braces. Tags are replaced with actual data when the report is generated.
Basic Tags
Insert a value from the data:
{{TableName.FieldName}}
Example:
<h2>{{Recipe.Name}}</h2>
<p>Total weight: {{Recipe.FinalWeight}} g</p>
Format Specifier for Decimals
Control the number of decimal places for numeric values:
{{TableName.FieldName:N}}
Where N is the number of decimal places (0, 1, 2, 3, etc.)
Example:
<p>PAC: {{RecipeData.PAC:1}}</p>    <!-- Shows: 245.7 -->
<p>PAC: {{RecipeData.PAC:0}}</p>    <!-- Shows: 246 -->
Pre-formatted Label Fields
Fields starting with lbl (like lblEU_Fat, lblUS_Calories) are pre-formatted with proper decimal places and units according to EU or US labeling regulations.
Important: Do NOT add units after lbl fields – they already include them!
<!-- Correct -->
<p>Fat: {{RecipeData.lblEU_Fat}}</p>           <!-- Shows: 12.5 g -->

<!-- Wrong - will show double units -->
<p>Fat: {{RecipeData.lblEU_Fat}} g</p>         <!-- Shows: 12.5 g g -->
Repeat Blocks
Loop over multi-row tables like Ingredients or RecipeSet:
{{#REPEAT:TableName}}
  ... content repeated for each row ...
{{/REPEAT:TableName}}
Example – Ingredient list:
<table>
  <tr>
    <th>Ingredient</th>
    <th>Weight</th>
  </tr>
{{#REPEAT:Ingredients}}
  <tr>
    <td>{{Ingredients.Name}}</td>
    <td>{{Ingredients.Weight}} g</td>
  </tr>
{{/REPEAT:Ingredients}}
</table>
Sorting Repeat Blocks
Control row order inside a REPEAT block with the SORT parameter:
{{#REPEAT:TableName:SORT=FieldName:ASC}}    ascending
{{#REPEAT:TableName:SORT=FieldName:DESC}}   descending
{{#REPEAT:TableName:SORT=FieldName}}        direction defaults to ASC
Example – heaviest ingredient first:
{{#REPEAT:Ingredients:SORT=Weight:DESC}}
  <tr><td>{{Ingredients.Name}}</td><td>{{Ingredients.Weight:1}} g</td></tr>
{{/REPEAT:Ingredients}}
Numeric fields sort numerically and text fields alphabetically. If the sort field doesn’t exist, rows simply keep their natural order – no error.
Nested Repeat Blocks
For parent-child data (like production Plans and their PlanIngredients), repeat a child table filtered to the current parent row:
{{#REPEAT:Plans}}
  <h3>{{Plans.RecipeName}}</h3>
  {{#REPEAT:PlanIngredients:PlanIndex=Plans.Index}}
    <p>{{PlanIngredients.IngredientName}}</p>
  {{/REPEAT:PlanIngredients}}
{{/REPEAT:Plans}}
The syntax is {{#REPEAT:ChildTable:ChildFilterColumn=ParentTable.ParentColumn}} – only child rows whose filter column matches the current parent row are repeated. Filtering and sorting combine: {{#REPEAT:PlanIngredients:PlanIndex=Plans.Index:SORT=Weight:DESC}}.
Linked Tables
Some tables are linked behind the scenes – for example RecipeSetData is linked to RecipeSet. Inside a REPEAT block for the parent table you can reference fields from the linked table directly, and the engine picks the matching row for each parent row:
{{#REPEAT:RecipeSet}}
  <tr>
    <td>{{RecipeSet.Name}}</td>
    <td>{{RecipeSetData.Cost per Liter:2}}</td>
  </tr>
{{/REPEAT:RecipeSet}}
Use RecipeSetData for per-recipe calculated values inside a RecipeSet repeat – RecipeData holds the combined values for all recipes together. You can also sort by a linked field: {{#REPEAT:RecipeSet:SORT=RecipeSetData.Cost per Liter:DESC}}.
Conditional Blocks
Show content only if a field has a value (not empty):
{{#IF:TableName.FieldName}}
  ... content shown only if field has a value ...
{{/IF:TableName.FieldName}}
Example – Show allergens only if present:
{{#IF:Recipe.Contains}}
<p><strong>Contains:</strong> {{Recipe.Contains}}</p>
{{/IF:Recipe.Contains}}

{{#IF:Recipe.MayContain}}
<p><strong>May contain traces of:</strong> {{Recipe.MayContain}}</p>
{{/IF:Recipe.MayContain}}
QR Codes and Barcodes
Render any field value – or a fixed text – as a scannable code. The tag is replaced with a ready-made image at that position:
{{QR:TableName.FieldName}}                  QR code (150px)
{{QR:TableName.FieldName:200}}              QR code with custom size in pixels
{{QR:"https://mysite.com"}}                 QR of a fixed text (quotes required)

{{BARCODE:TableName.FieldName:EAN13}}       EAN-13 (value must be 12 or 13 digits)
{{BARCODE:TableName.FieldName:CODE128}}     Code 128 (any text, e.g. lot numbers)
{{BARCODE:TableName.FieldName:CODE128:80}}  Code 128 with custom bar height
- An empty or invalid value renders nothing – an EAN-13 with a wrong check digit is never rendered as a wrong-but-scannable code
- Works inside REPEAT blocks using each row’s value (per-recipe links, lot numbers)
- Don’t wrap the tag in an
<img>tag, and don’t stretch the result with CSS – use the size parameter instead, or barcode scanners may fail to read it
Example: the Batch Label default template turns the entered batch number into a barcode with {{BARCODE:Input.BatchNumber:CODE128:40}}.
Image Fields
Some tables expose stored images as plain image URLs (empty when no image is set) – for example Recipe.ImageUrl (the recipe’s official image), RecipeSet.ImageUrl (per-recipe inside a RecipeSet repeat), and Data.ImageUrl (the product image in Product reports). Use them as the source of an image tag, wrapped in an IF block so nothing renders when no image is set:
{{#IF:Recipe.ImageUrl}}
<img src="{{Recipe.ImageUrl}}" style="width:120px; height:120px; object-fit:cover;">
{{/IF:Recipe.ImageUrl}}
User Input Fields
Ask the person generating the report for values that aren’t part of the recipe data – batch numbers, best-before dates, a signature line. Declare each field once, anywhere in the template:
{{#INPUT:FieldName|Label|text|Default value}}
- FieldName: letters and digits only (no spaces) – you reference the entered value as
{{Input.FieldName}} - Label: the text shown next to the input box in the dialog
- Type: only
textis supported today - Default: optional pre-filled value (may be left empty)
Declarations never appear in the report output. When you generate (or preview) the template, a dialog collects the values first, and they become a single-row Input table – so all the normal tag forms work:
{{#INPUT:BatchNumber|Batch number|text|}}
{{#INPUT:BestBefore|Best before|text|See packaging}}

<p><strong>Batch:</strong> {{Input.BatchNumber}}</p>

{{#IF:Input.BatchNumber}}
<p>Only shown when a batch number was entered</p>
{{/IF:Input.BatchNumber}}
Entered values are remembered per template and pre-filled the next time you generate. The default Batch Label recipe template is a ready-made example of this feature.
Combining Tags
You can combine different tag types in a single template:
<h1>{{Recipe.Name}}</h1>
<p>Net weight: {{Recipe.FinalWeight}} g</p>

<h3>Ingredients</h3>
{{#REPEAT:Ingredients}}
<p>{{Ingredients.Name}}: {{Ingredients.Weight:0}} g ({{Ingredients.WeightPercent:1}}%)</p>
{{/REPEAT:Ingredients}}

{{#IF:Recipe.Contains}}
<p><strong>Allergens:</strong> {{Recipe.Contains}}</p>
{{/IF:Recipe.Contains}}

<h3>Nutrition per 100g</h3>
<p>Energy: {{RecipeData.lblEU_EnergyKcal}}</p>
<p>Fat: {{RecipeData.lblEU_Fat}}</p>
Python Template Scripts
Every template can carry an optional Python script that runs right before the template is processed. The script receives all the report data, can change values, add computed fields, or build entirely new tables – and everything it adds becomes available to normal template tags. Templates without a script work exactly as before.
Note: Python template scripts are a Premium feature.
How It Works
- Open the Template Editor and switch to the Python Script tab
- Write your script and click Save (leave the tab empty for no script)
- When the report is generated, the script runs after the input dialog (if any) and before the template is rendered
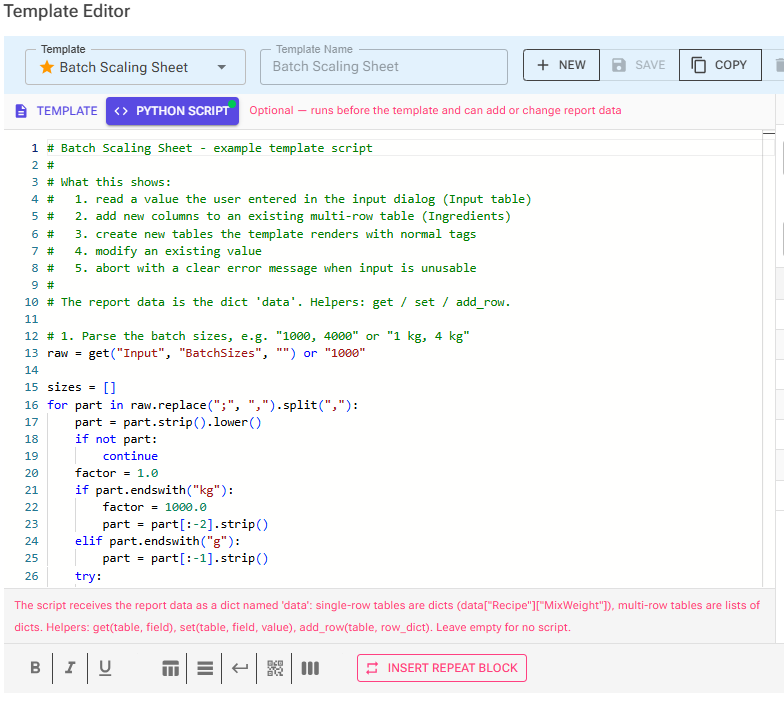
The script receives the report data as a Python dict named data:
- Tables with a single row are dicts:
data["Recipe"]["MixWeight"],data["Input"]["BatchNumber"] - Tables with several rows are lists of dicts:
data["Ingredients"][0]["Weight"]
Whatever the script changes is what the template renders. A new key becomes a normal tag, and a new list-table can be used in REPEAT blocks.
Helper Functions
Three helpers are predefined so most scripts never need to touch the dict directly:
| Helper | What it does |
|---|---|
get(table, field, default=None) |
Reads a value (first row for multi-row tables); returns the default when missing |
set(table, field, value) |
Writes a value, creating the table if it doesn’t exist yet |
add_row(table, row_dict) |
Appends a row, creating the table as a multi-row table if needed |
Example
Compute a value and render it with a normal tag:
# Python script
cost = sum((row.get("Cost") or 0) for row in data["Ingredients"])
set("Calc", "TotalCost", round(cost, 2))
<!-- HTML template -->
<p>Total ingredient cost: {{Calc.TotalCost:2}}</p>
Scripts receive raw numeric values (like 42.5), not display-formatted text – formatting still happens in the template with :N specifiers. Fields starting with lbl are the exception: they are pre-formatted label strings.
Errors and Debugging
If the script raises an error, the report is not generated – a dialog shows the full Python error message plus anything the script printed, so print() is a handy debugging tool. The same applies in Preview.
Previewing Scripted Templates
Preview runs the script too – including unsaved script changes – so what you preview is what generation produces. Use the Run script switch next to the Preview button to temporarily skip the script while you work on layout; script-computed tags then stay as raw {{Tags}} in the preview, and a short note reminds you the script was skipped.
Python runs directly in your browser – no external service is involved. The very first script run after the app loads can take a few seconds while the Python environment initializes – a “Preparing Python environment” indicator is shown if you get there first.
Learn From the Example Template
The default recipe template Batch Scaling Sheet is a complete working example. It asks for batch sizes (like “1000, 4000” or “1 kg, 4 kg”), then its script scales every ingredient to each batch size, adds the results as new columns, computes per-batch costs, and marks the heaviest ingredient. Copy it to see how the input dialog, the script, and the template tags work together.
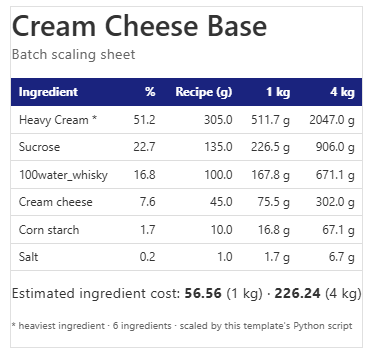
Available Data Tables
The data available depends on the report type. Use the DataSet Browser in the Template Editor to explore all available fields and see example values.
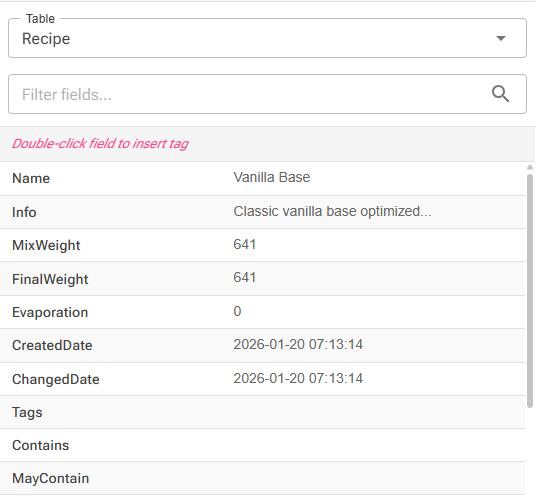
Common Tables and Fields
Recipe (single row)
| Field | Description |
|---|---|
| Name | Recipe name |
| Info | Recipe description |
| MixWeight | Weight before processing (grams) |
| FinalWeight | Weight after evaporation (grams) |
| Contains | Standard allergens present |
| MayContain | Allergens that may be present as traces |
| IngredientsFormatted | Ingredient list with allergens highlighted in bold |
| Tags | Recipe tags |
RecipeData (single row – calculated values)
| Field | Description |
|---|---|
| lblEU_EnergyKcal | Energy in kcal (EU format with unit) |
| lblEU_Fat | Fat per 100g (EU format with unit) |
| lblEU_Carbohydrates | Carbohydrates per 100g (EU format with unit) |
| lblEU_Protein | Protein per 100g (EU format with unit) |
| lblEU_Salt | Salt per 100g (EU format with unit) |
| PAC | Freezing point depression (numeric) |
| POD | Relative sweetness (numeric) |
| MSNF | Milk solids non-fat (numeric) |
US format fields are also available (lblUS_Calories, lblUS_Fat, etc.)
Ingredients (multi-row – use with REPEAT)
| Field | Description |
|---|---|
| Name | Ingredient name |
| Category | Ingredient category |
| Weight | Weight in grams |
| WeightPercent | Percentage of total recipe |
| Cost | Cost for this amount |
| CostKg | Cost per kilogram |
RecipeSet (multi-row – use with REPEAT)
| Field | Description |
|---|---|
| Index | Row number (1, 2, 3…) |
| Name | Recipe name |
| Quantity | Number of units |
| UnitWeight | Weight per unit |
| TotalWeight | Total weight (Quantity × UnitWeight) |
| IngredientsFormatted | Formatted ingredient list for this recipe |
| Contains | Allergens for this recipe |
Tip: The DataSet Browser shows ALL available fields with their current values. Use the filter to quickly find fields by name.
Default Templates
The system includes several ready-to-use templates. You cannot edit default templates directly, but you can copy them to create your own customized version.
Recipe Set Templates
- Pick List: A simple table listing recipes with quantities and weights – perfect for production planning
- Recipe Cards: Individual cards for each recipe showing ingredients and allergens
- Compact Label: A combined label with nutrition facts and allergen information
Recipe Templates
- Recipe Label: Standard product label format
- Professional Specification Sheet: Comprehensive spec sheet with nutrition panels, ice cream science metrics, and composition data
- Batch Label: Product label with batch number and best-before date collected in an input dialog when you generate
- Batch Scaling Sheet: Ingredient weights scaled to batch sizes you enter at print time – a working example of the Python script feature
Ingredient Templates
- Ingredient Data Sheet: Detailed report for a single ingredient
- Ingredient Comparison: Side-by-side comparison table for multiple ingredients
- Ingredient List: Simple list format for multiple ingredients
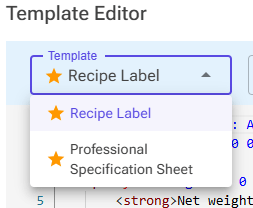
Creating Custom Templates
Starting from a Default Template
The easiest way to create a custom template is to start from an existing one:
- Select a default template from the dropdown
- Click Copy – this creates an editable copy
- Rename the template to something descriptive
- Modify the HTML as needed
- Click Preview to test your changes
- Click Save when satisfied
Building from Scratch
- Click New to create a blank template
- Give it a descriptive name
- Write your HTML using the tag syntax
- Use the DataSet Browser to find available fields – double-click to insert
- For multi-row tables (Ingredients, RecipeSet), click Insert Repeat Block to add the loop structure
- Use Preview frequently to check your progress
- Save your work
Template Design Tips
For print-ready templates:
- Use inline CSS styles (not external stylesheets)
- Add
page-break-inside: avoid;to keep elements together - Use
page-break-before: always;to force new pages - Use pt or mm units for precise sizing
- Avoid complex gradients (may not print well)
General best practices:
- Use
border-collapse: collapse;on tables - Right-align numbers, left-align text
- Use consistent padding (8-12px for table cells)
- Test with Preview before saving
Copy AI Prompt
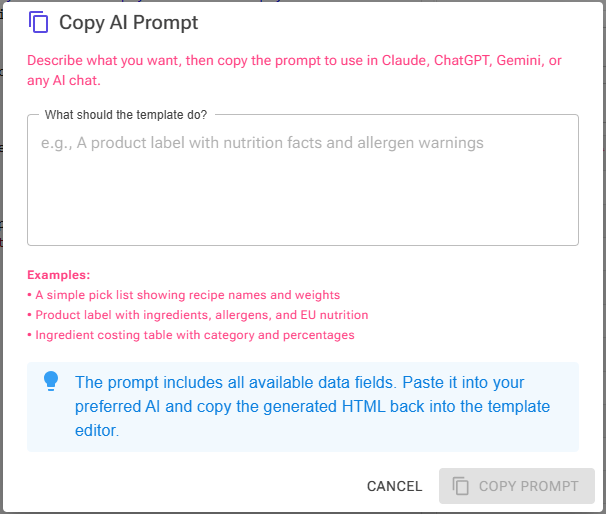
- Click Copy AI Prompt in the toolbar
- Describe what kind of template you want
- Copy the prompt and paste it into your AI assistant
- Paste the AI’s HTML into the Template tab (and any proposed script into the Python Script tab)
- Preview, then continue the conversation with the AI until the result is right
The prompt includes everything the AI needs:
- The full template syntax rules – including input field declarations and the Python script feature
- All available fields from your current data
- Instructions for creating a template
Example requests:
- “A simple pick list with recipe names and quantities in a clean table”
- “A product label with nutrition facts in EU format and allergen warnings”
- “A batch sheet that asks for the number of tubs and calculates the mix weight per tub”
Tip: The AI can propose a Python script together with the template when your request needs computed values. It delivers the script in a separate code block – paste it into the Python Script tab.
Tips & Best Practices
Use conditional blocks for optional content Wrap allergen sections in {{#IF}} blocks so they don’t show up empty when there are no allergens.
Don’t add units to lbl fields Fields like lblEU_Fat already include the unit (e.g., “12.5 g”). Adding another “g” will result in “12.5 g g”.
Use format specifiers for clean numbers Instead of showing “245.67892”, use {{RecipeData.PAC:1}} to show “245.7”.
Preview often Click Preview frequently while building templates to catch issues early.
Copy before customizing Always copy a default template before modifying – you can’t undo changes to the original defaults.
Test with different data If your template will be used with different recipes, test it with recipes that have varying amounts of data (some with allergens, some without, etc.).
Use the DataSet Browser Don’t try to memorize field names. Use the DataSet Browser to explore available fields and double-click to insert them correctly.
Use input fields for per-printout values Batch numbers, best-before dates, and signatures change with every printout – declare them as {{#INPUT:...}} fields instead of editing the template each time.
Let a Python script do the math When a template needs values that don’t exist in the data – scaled batch weights, cost per liter, custom groupings – compute them in the template’s Python script instead of bending the tag syntax. Start from the Batch Scaling Sheet example.
This feature is available to registered users; Python template scripts require a Premium subscription. The report system continues to evolve – additional report types and locations may be added in future updates.