Web App Automatic Recipe Balancing – Complete Guide
Introduction
Automatic balancing is a powerful tool that helps you create well-balanced ice cream recipes by automatically adjusting ingredient weights to achieve target properties. A balanced recipe achieves the right texture, creaminess, flavor, sweetness, and firmness through the careful selection and proportion of ingredients.
The balancing system works by:
- Setting target properties (like fat %, sweetness, serving temperature) using charts
- Classifying ingredients so the balancer knows what each one is for
- Automatically adjusting ingredients to reach the targets within sensible per-ingredient bounds
- Maintaining recipe weight while respecting your constraints
The latest version introduces the Smart Balance dialog, which lets you classify ingredients into functional roles before balancing. This makes balancing dramatically more reliable: the balancer no longer freely changes your flavoring or stabilizer amounts, because each class carries sensible default bounds. Under the hood, the algorithm has also been rewritten around a linear-programming solver, making it roughly 10× faster than the previous balancer and much better at handling tight constraints.
Understanding the Color System
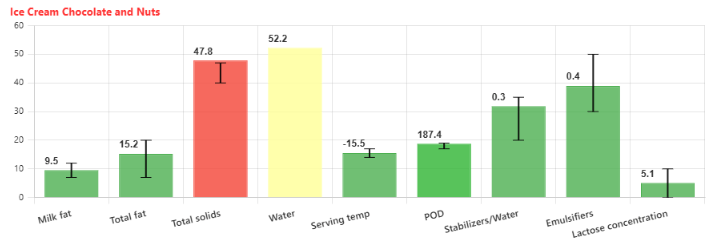
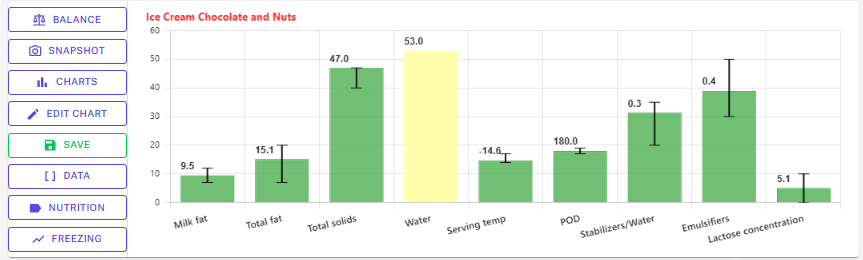
The chart uses colors to show how well your recipe matches the target ranges:
- ?? Green bars – Property is within the target range (good!)
- ?? Red bars – Property is outside the target range (needs adjustment)
- ?? Yellow bars – No target range set (for reference only)
Black error bars show the acceptable min/max range for each property.
Getting Started with Balancing
Step 1: Select a Chart
Charts define the target properties for your recipe. Different ice cream styles need different targets.
- Click the Charts button in the chart sidebar
- Browse available charts (Default charts or your Personal charts)
- Select a chart that matches your ice cream style (e.g., “Ice Cream”, “Gelato”, “Sorbet”)
- The chart will display showing your recipe’s current values
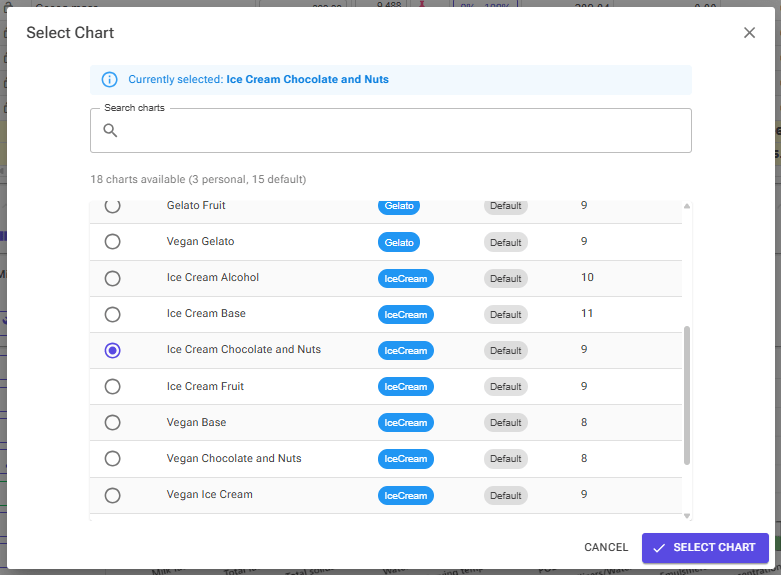
Tip: Start with a Default chart like “Ice Cream Base” and adjust from there.
Step 2: Check Your Recipe Status
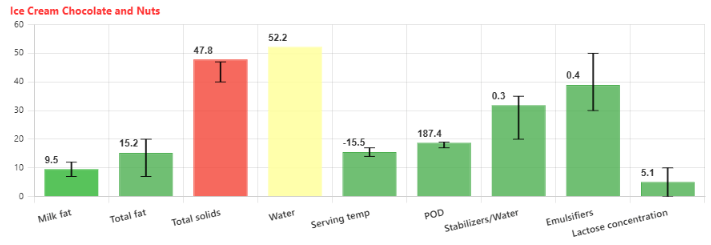
Look at the chart bars:
- If most bars are green, your recipe is already well-balanced
- If several bars are red, balancing can help
- Yellow bars won’t be used in balancing (no target set)
Step 3: Click Balance to Open the Balance Dialog
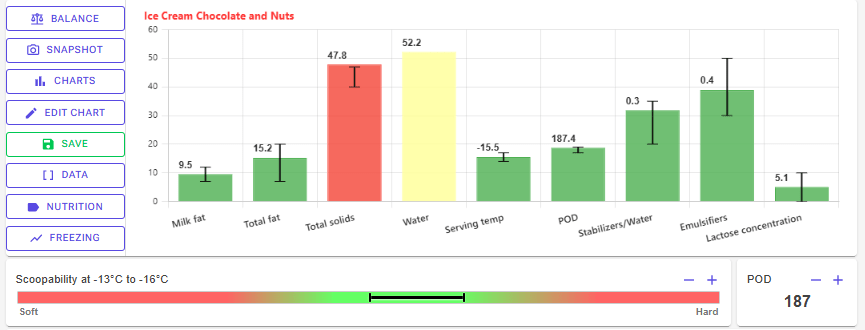
Click the Balance button in the chart sidebar. This opens the Balance dialog, where you review and adjust how each ingredient should be treated before the balancer runs. The dialog is the centerpiece of the new balancing workflow — the next section covers it in detail.
From the dialog you can:
- See each ingredient’s pre-assigned class (Flavor, Stabilizer, Emulsifier, etc.) and change it with one click
- Lock ingredients you don’t want changed at all
- Let AI classify everything for you (Premium)
- Optionally see a summary of what changed once balancing is done
- Click Balance in the dialog to run the algorithm
Balancing typically takes 1–2 seconds with the new algorithm.
The Balance Dialog
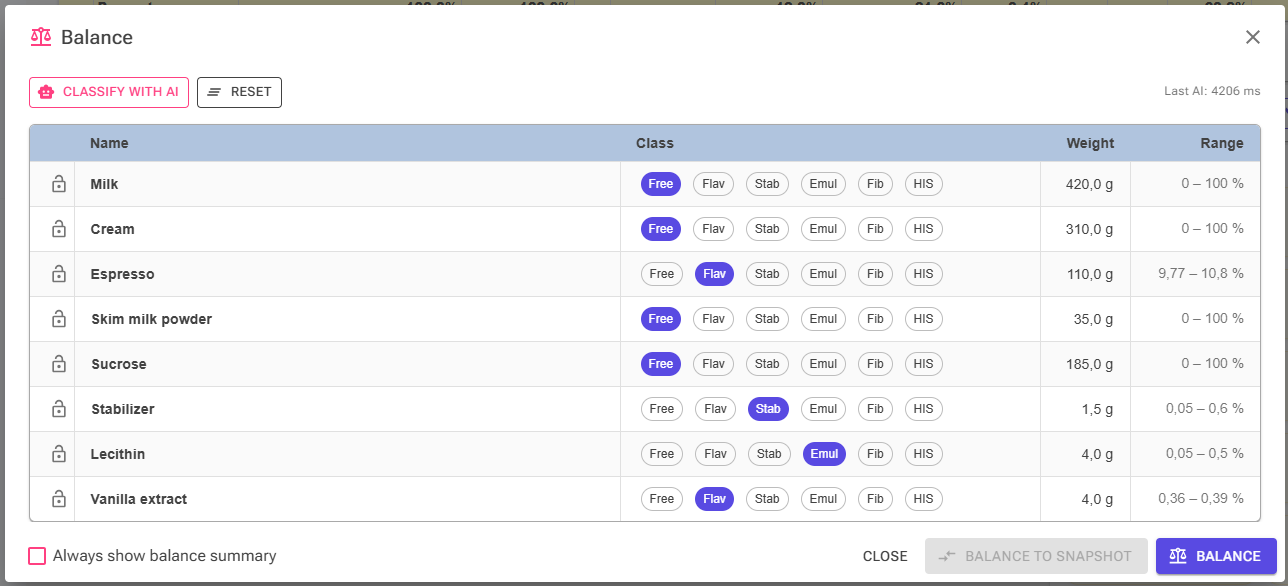
When you click Balance in the chart sidebar, the Balance dialog opens. Each ingredient in your recipe is shown in a row with four things you can control:
- A lock toggle (left column)
- The ingredient name
- A row of class chips to set the ingredient’s functional role
- The resulting weight range the balancer will be allowed to use
Why Classify Ingredients?
The old balancer could freely change any unlocked ingredient. That made it easy for the algorithm to push a flavoring like strawberry purée from 12% down to 4% just because it helped some target — even though the resulting recipe would no longer taste like strawberry ice cream.
You could prevent this by setting Min%/Max% on each ingredient manually, but doing it one ingredient at a time was tedious. The Balance dialog solves this by letting you classify each ingredient with a single click. The class then automatically applies a sensible weight range, so the balancer can’t blow your recipe up.
The Classes
There are six chips you can pick from. Each one (except Free) tells the balancer what range of weights is acceptable for that ingredient:
| Chip | Meaning | Effective range |
|---|---|---|
| Free/Custom | No class-based bound. The balancer uses whatever Min%/Max% you have set on the ingredient manually (or 0–100% if none). | Your manual range |
| Flav (Flavor) | A flavoring you want to keep close to its current amount — strawberry purée, cocoa, vanilla extract, fruit pieces. | ±5% of current weight |
| Stab (Stabilizer) | A stabilizer used at small dosages. Typical professional range. | 0.05% – 0.6% of mix |
| Emul (Emulsifier) | An emulsifier like lecithin or mono- and diglycerides. | 0.05% – 0.5% of mix |
| Fib (Fiber) | An added fiber (inulin, oligofructose, etc.). Capped so it can’t take over the recipe. | 0% – 5% of mix |
| HIS (High-Intensity Sweetener) | Stevia, sucralose, monk fruit, etc. — ingredients where even tiny weight changes massively change perceived sweetness. | ±1% of current weight |
How Ingredients Get Pre-Classified
When the dialog opens, the chips aren’t blank — the app makes an educated guess for each ingredient using this priority order:
- Previously stored class – If you balanced this recipe before and accepted a class for this ingredient, that class is remembered and pre-filled.
- Existing manual Min%/Max% – If you previously set a manual amount range on the ingredient, the chip is left as Free and your manual range is shown in the Range column. Your manual work is never silently overridden.
- Property-based heuristic – For the remainder, the app guesses from ingredient properties: high stabilizer content → Stab, high emulsifier content → Emul, salt or alcohol-rich ingredients → Flav. Everything else starts as Free.
You can override any of these pre-classifications by clicking a different chip.
Lock Column
The leftmost column is a lock toggle. Locked ingredients are completely frozen — the balancer will not change their weight by a single gram, no matter what their class is. Use lock when you have an exact amount you don’t want to negotiate with the algorithm.
Locking is stricter than picking the Flav chip. Flav allows ±5% wiggle room; lock allows zero.
Classify with AI (Premium)
The Classify with AI button asks Claude to look at every ingredient in your recipe and pick a class for each, with a short reason for the choice. This is useful when you have a complex recipe with many ingredients, or when you’re not sure what role an unfamiliar ingredient should play.
This is a Premium feature. Free users can classify ingredients manually using the chips, which works just as well for any recipe; AI classification is a convenience for when you don’t want to think about it.
A few notes on AI classification:
- It overwrites the current chip selections, but only for ingredients without an explicit manual Min%/Max%. If you’ve set a manual range on an ingredient, AI leaves it alone.
- You can still adjust individual chips after running AI — the AI is a starting point, not the final word.
- If the AI is unsure, it leaves the chip on Free.
Reset Button
The Reset button clears all chip selections back to Free. Locks are preserved. This is useful if you want to run the balancer against only the bounds you’ve set manually on the ingredients.
Important: How the Chip Interacts With Your Manual Ranges
The chip is the single source of truth for an ingredient’s bounds during balancing:
- If you pick a non-Free chip (Flav, Stab, Emul, Fib, HIS), the class range applies and any manual Min%/Max% you set on the ingredient is ignored for this balance.
- If the chip is Free, your manual Min%/Max% applies.
Example: Suppose you set pistachio paste to a manual range of 4–12% because that’s the window you’re willing to taste-test in. If you then pick the Flav chip, the balancer will use ±5% of the current pistachio weight, not 4–12%. To keep the 4–12% range, leave the chip on Free — the dialog will show your manual range in the Range column.
The Balance Result Summary
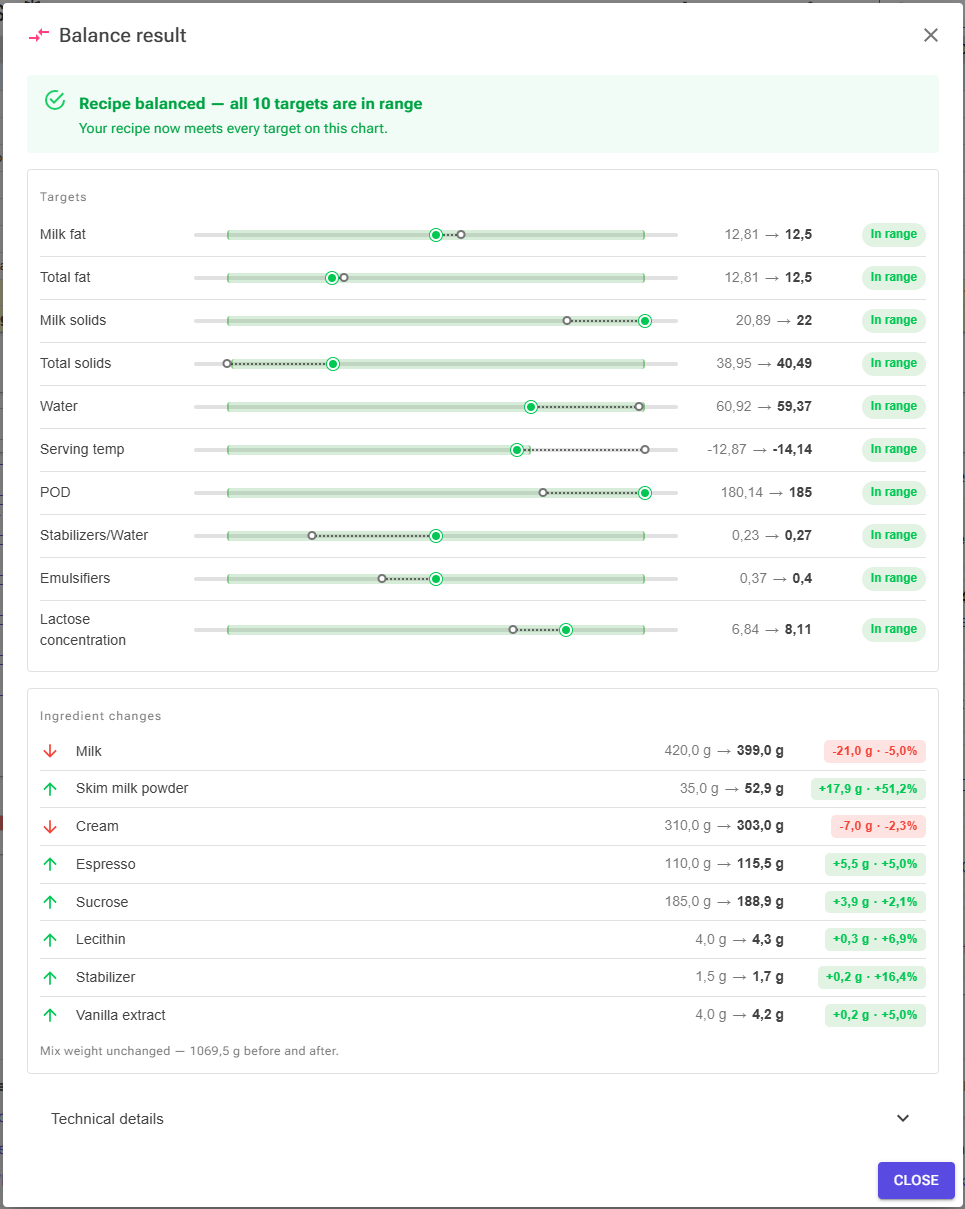
After balancing finishes, a Balance result summary can open. It shows how each target moved (with its range), every adjusted ingredient with its old weight, new weight, and the difference, and technical details about the run. This is helpful for understanding what the balancer did and whether the changes match your expectations.
The summary opens automatically whenever the result needs your attention — any target still out of range, a recipe kept unchanged by the safety net, or contradictory targets. The Always show balance summary checkbox at the bottom of the Balance dialog additionally opens it when every target lands in range, so you can always review the changes if you prefer.
Running the Balance
Once you’re happy with the chips and locks, click the blue Balance button in the dialog. The balancer runs (typically 1–2 seconds), the dialog closes, and your recipe is updated. The chip selections and lock states are saved to the recipe, so the next time you open the dialog everything will be remembered.
If you click Close instead of Balance, none of your chip changes or lock changes are saved.
Balance Advice — When Targets Can’t Be Reached
Sometimes no amount of rebalancing can bring every property into range — your recipe is simply missing a kind of ingredient. When any target ends up out of range, the Balance result summary shows a Get advice panel right below the verdict. Click it to find out what type of ingredient would unlock the failing targets.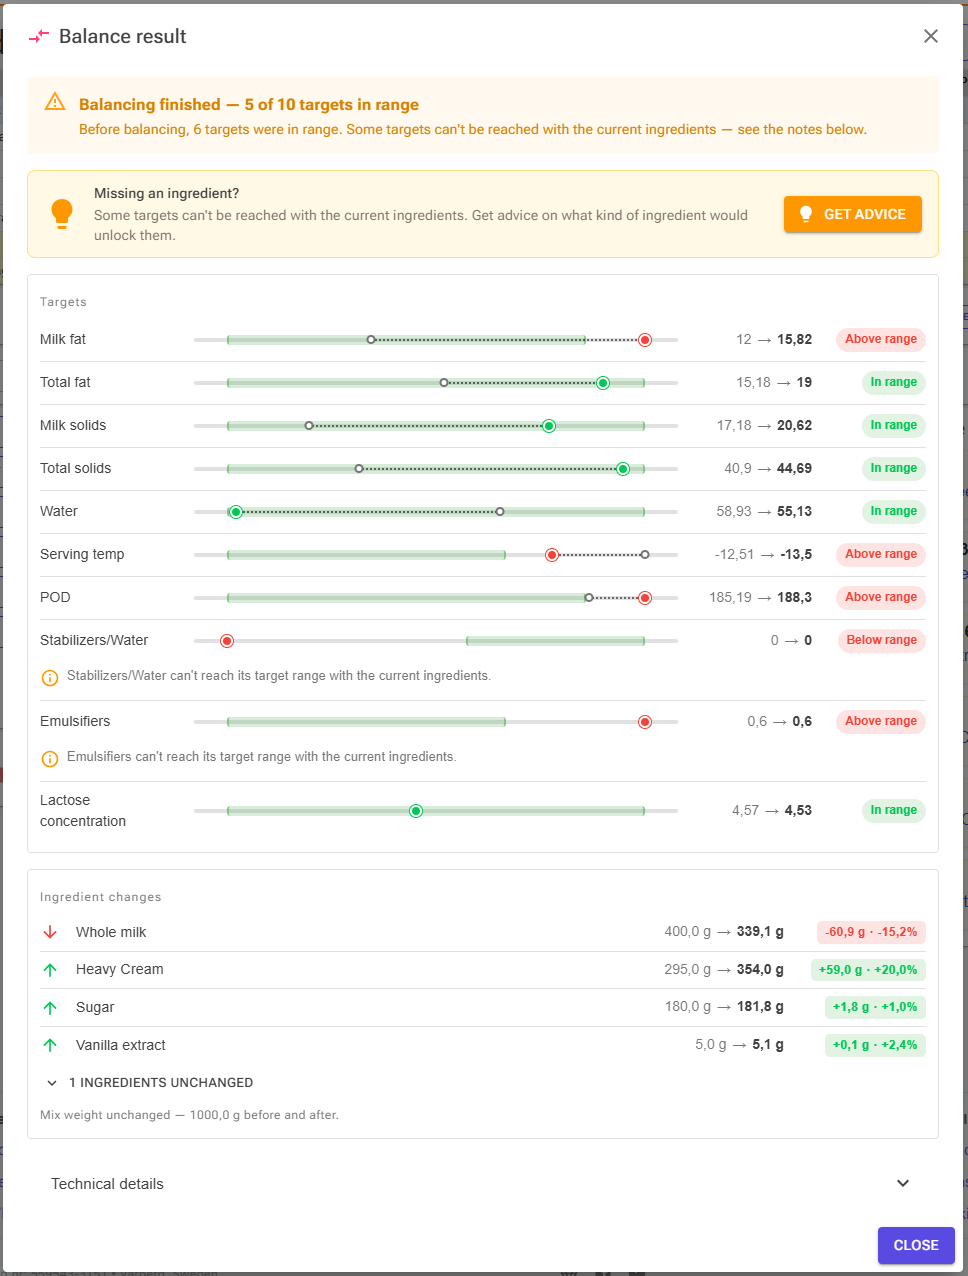
What the Advice Tells You
The analysis takes a few moments — it tests your recipe against a set of pure ingredient types (water, different sugars, milk solids, fats, protein, stabilizer, emulsifier, and more) and finds the smallest set of additions that would make the failing targets reachable together. It then verifies the suggestion by running a real balance behind the scenes.
For each suggested addition you see:
- What to add — the ingredient type with familiar examples, e.g. “A stabilizer (e.g. locust bean gum or guar gum)” or “A sugar with strong freezing-point depression (e.g. dextrose or invert sugar)”.
- A starting amount — an order of magnitude such as “start with a very small amount (well under 0.5% of the mix)”. It’s deliberately not an exact dose: the right amount depends on the specific ingredient you choose (cream and butter carry very different amounts of milk fat, for example).
- Which targets it unlocks — e.g. “Needed to reach: POD, Serving temp”, so you understand why each addition is on the list.
- Verification — a green confirmation when a test balance with these additions brought every target into range.
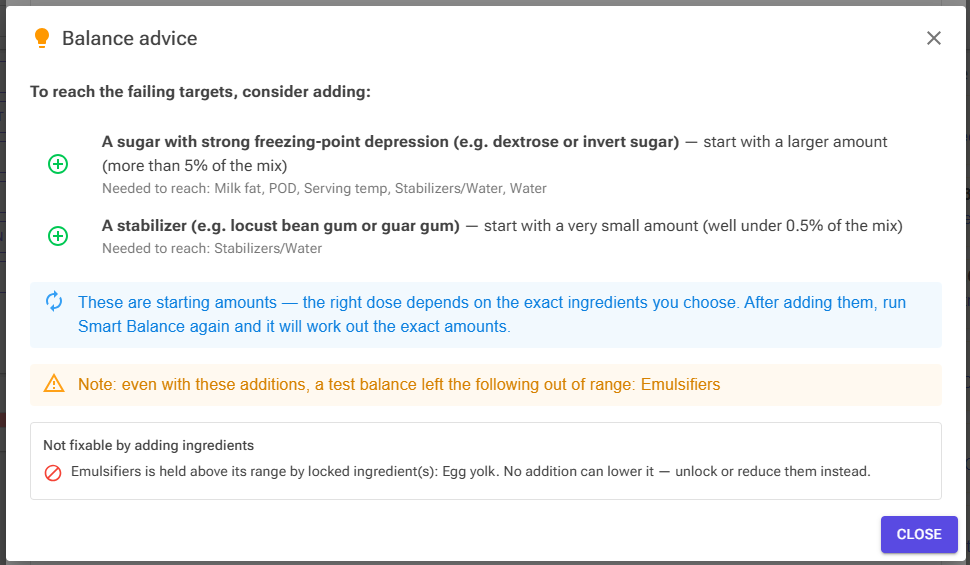
Important: These are starting amounts. Add the suggested ingredients to your recipe, then run Balance again — the balancer will work out the exact amounts for the ingredients you actually chose.
What Advice Can’t Fix
Some targets can’t be fixed by adding anything, and the advice says so under Not fixable by adding ingredients. The most common case is a locked ingredient holding a property out of range — for example, locked egg yolks keeping Emulsifiers above its range. Adding more of something can never lower a value that a fixed ingredient pushes too high, so the advice names the locked ingredient and suggests unlocking or reducing it instead.
Manual Balancing Methods
While automatic balancing is powerful, you often need manual control for precision adjustments. The web app provides several manual balancing tools.
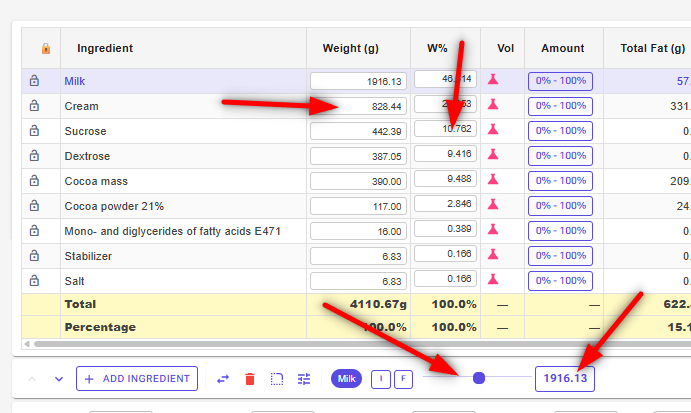
Weight
You can change the weight of an ingredient in different ways. Change the weight directly in the table or use the weight slider. You can also change the W% edit or use the advanced weight dialog.
Ratio Adjustment Tool
Control two ingredients together:

- Select first ingredient
- Click Tune button to open ratio panel
- Select second ingredient from chips
- Use dual sliders to adjust ratio
- Total weight of both ingredients stays constant
- Click Apply when satisfied
Use cases:
- Adjusting milk/cream ratio
- Balancing different sugars
- Fine-tuning stabilizer blends
Volume Conversion
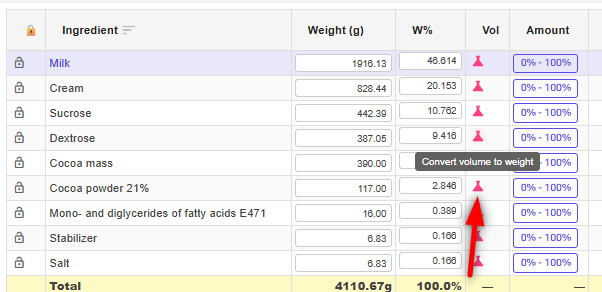
You can open the volume conversion dialog to convert a volume to weight. The calculator works in grams so if you have a recipe with volume units you need to convert volume to weight.
Quick Adjustments
For fast, targeted changes without full balancing:
Scoopability Adjustment (PAC)
The Scoopability Bar shows how firm your ice cream will be:

- Click minus (−) to make softer (decrease PAC by ~3 units)
- Click plus (+) to make firmer (increase PAC by ~3 units)
Use this when: Your ice cream is too hard or too soft at serving temperature.
Sweetness Adjustment (POD)
The POD Card shows relative sweetness:
- Click minus (−) to make less sweet (decrease POD by ~3 units)
- Click plus (+) to make sweeter (increase POD by ~3 units)
Use this when: You want to adjust sweetness without changing texture.
Controlling Individual Ingredients
The Smart Balance dialog is the primary way to control individual ingredients during balancing, but the older mechanisms still work and are useful for fine-tuning.
Locking Ingredients
Lock an ingredient to exclude it from balancing:
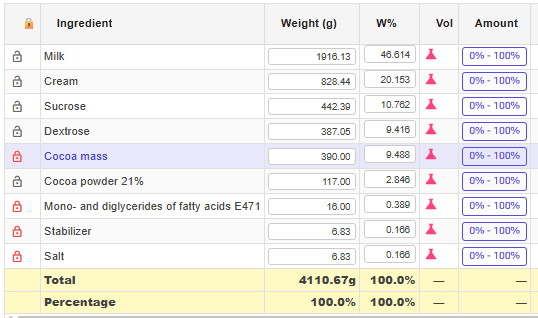
- Click the lock icon (??) next to the ingredient name (either in the main recipe table or in the Smart Balance dialog)
- Icon turns red when locked
- Locked ingredients keep their exact weight during balancing
When to lock:
- An ingredient where the weight is already exactly right
- You want a hard guarantee the balancer can’t touch it (stricter than the Flav class’s ±5% allowance)
In most cases, picking the right class chip in the Smart Balance dialog is a better option than locking outright — it lets the balancer make small useful adjustments while still protecting the character of the recipe.
Setting Amount Ranges Manually
If a class chip doesn’t quite match what you want, you can set a precise Min%/Max% range on an individual ingredient. This is useful when:
- You want a specific range like 4–12% for pistachio paste
- You want a hard maximum on a cost-sensitive ingredient
- None of the class presets fit your situation
- Click the Amount button for an ingredient
- Set Min % (minimum percentage of recipe)
- Set Max % (maximum percentage of recipe)
- Click Apply
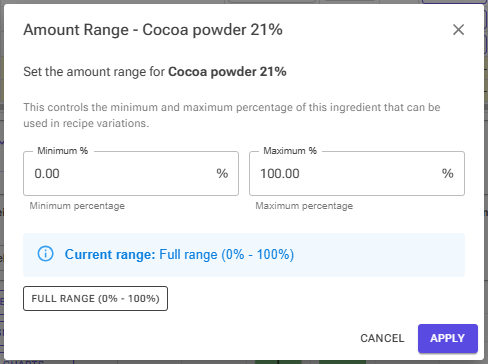
Example: Set sugar to Min: 10%, Max: 20% to ensure it stays between 10–20% of recipe weight.
Default range: 0% to 100% (ingredient can be adjusted freely)
How it interacts with the Smart Balance dialog: When you open the dialog, ingredients with a manual range are detected automatically and shown with the Free chip selected and your range displayed in the Range column. As long as the chip stays on Free, your manual range is what the balancer uses. If you pick a non-Free chip, the class range takes over and your manual range is ignored for that balance run.
Understanding Charts
What is a Chart?
A chart is a collection of target properties that define a well-balanced recipe. Each property has:
- Min value – Lowest acceptable value
- Max value – Highest acceptable value
- Target value (optional) – Ideal value within the range
- Priority flag – Whether this property is critical
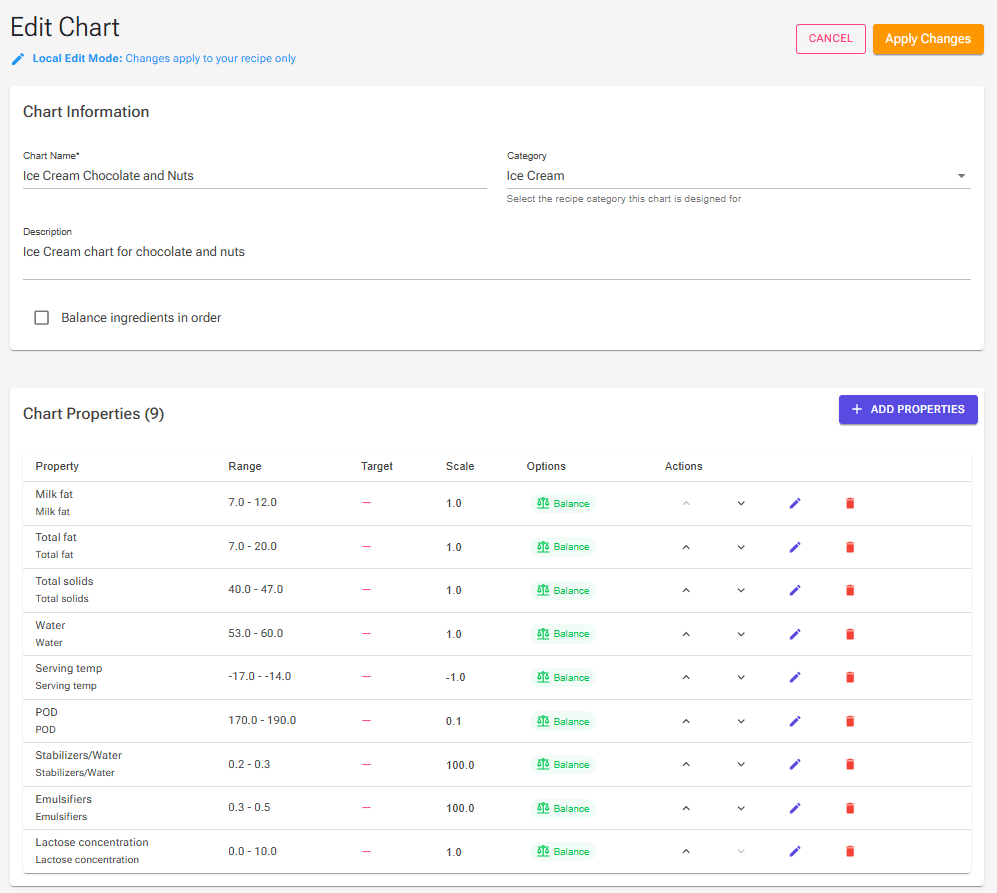
Chart Types
Default Charts:
- Created by ice cream experts
- Cover common ice cream styles
- Cannot be edited (but you can copy them)
- Can be edited temporarily from the Recipe Editor but these changes are not saved permanently.
Public Charts:
- Shared by other users
- Good starting points for specific styles
- Cannot be edited (but you can copy them)
Personal Charts:
- Your own custom charts
- Fully editable
- Can be created from scratch or copied from Default/Public charts
See the Charts documentation for details on creating and editing charts.
Advanced Balancing Techniques
Using Priority Properties
Some properties are more important than others. In charts, you can mark properties as High Priority (?):
- High priority properties get more weight during balancing
- The algorithm tries harder to get these in range
- Use for critical properties like fat % or total solids
Example: In a gelato chart, you might prioritize:
- Fat % (must be lower than ice cream)
- Total sugars (affects texture critically)
- Serving temperature (defines the style)
Controlling Property Ranges
When creating or editing charts:
Tight ranges (e.g., 38–40% total solids):
- Give precise control
- May be harder to achieve
- Use for critical properties
Loose ranges (e.g., 5–15% protein):
- Easier to achieve
- More flexibility
- Use for less critical properties
Best practice: Set tight ranges on what matters most, loose ranges on secondary properties.
Using Target Values
Within a Min-Max range, you can set a specific Target value:
- Without target: Algorithm aims for the middle of the range
- With target: Algorithm aims for the specific value
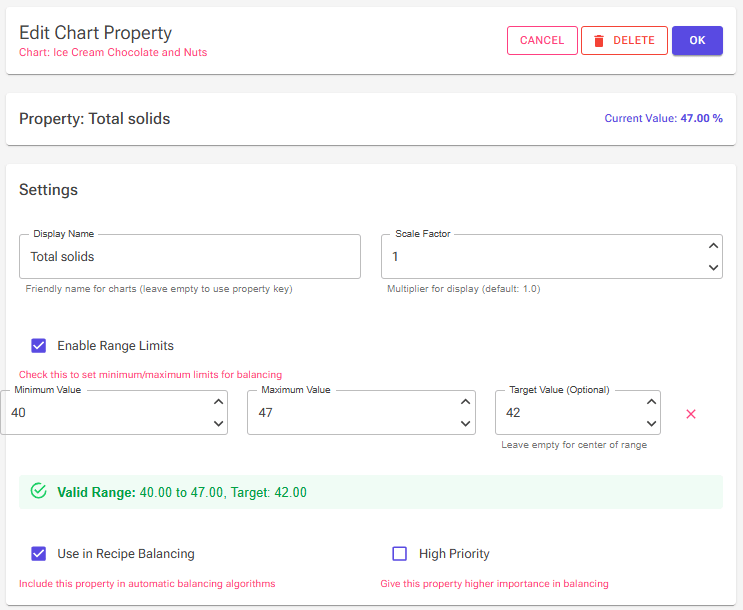
Example:
- Min: 40%, Max: 47%, Target: 42%
- Recipe will aim for 42% (not the center at 43.5%)
When to use targets:
- When you know the exact ideal value
- When the ideal isn’t in the middle of the acceptable range
- For fine-tuning after getting the recipe in range
Quick Edit
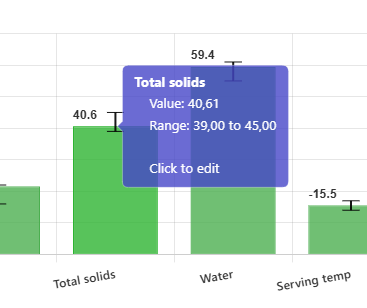
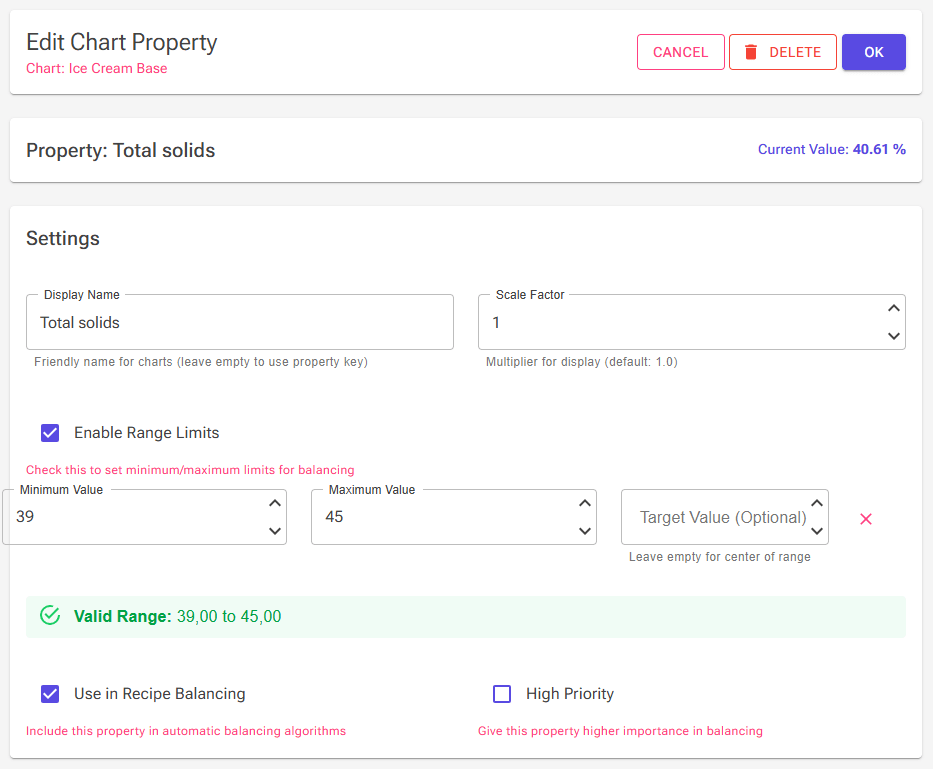
You can click on a bar in the chart to quickly edit that property. This changes your chart temporarily in your current recipe. To save the change permanently press the Save button to the left of the chart.
Snapshot Comparison
Compare your current recipe against a saved version:
Taking a Snapshot
From current recipe:
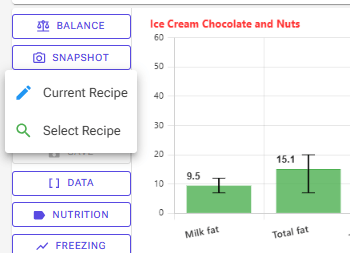
- Click the Snapshot dropdown in the chart sidebar
- Select Current Recipe
- Orange bars appear showing current values
From another recipe:
- Click the Snapshot dropdown
- Select Select Recipe
- Choose a recipe from the list
- Orange bars show that recipe’s values

Using Snapshots
Once a snapshot is active:
- Orange bars = Snapshot (comparison)
- Edit your recipe and see how it compares
- Great for making adjustments while preserving a reference
Balance to Snapshot
If a snapshot is activated you will find a Balance To Snapshot button in the Balance dialog.
Pressing this will try to balance the recipe to the same values as the snapshot recipe.
This is very useful if you have a recipe that you know is really good and like to match the chart properties for that recipe.
Common uses:
- Before/after comparison when adjusting a recipe
- Comparing your recipe to a known good recipe
- Tracking changes during development
Clearing Snapshots
Click Snapshot ON button to remove the comparison and hide orange bars.
Balancing Best Practices
Before Balancing
1. Use enough ingredients
Balancing needs flexibility. If you only have:
- One sugar source → Hard to control both sweetness AND texture
- One dairy source → Hard to adjust fat without changing other properties
Add variety:
- Multiple sugars (sucrose, dextrose, glucose syrup)
- Multiple dairy sources (milk, cream, milk powder)
2. Avoid conflicting targets
Don’t set targets that contradict each other:
- ? Total fat > Total solids (impossible!)
- ? Very high water + very high solids (conflicting)
- ? Make sure your chart targets make sense together
3. Make sure ingredients have the property
Don’t target properties your recipe can’t provide:
- No emulsifiers in recipe → Don’t set emulsifier targets
- No alcohol → Don’t set alcohol targets
4. Use the Smart Balance dialog to classify ingredients
- Review the pre-assigned class chips before clicking Balance
- Pick Flav for any ingredient that defines the flavor of your recipe (purée, paste, cocoa, extracts)
- Pick Stab, Emul, or Fib for technical ingredients used at small dosages
- Use the lock toggle only when you want a hard guarantee the weight cannot move at all
After Balancing
1. Check the results
Look at:
- Are critical properties green?
- Do ingredient weights make sense?
- Is anything surprisingly high or low?
If you enabled Show ingredient changes, the summary dialog makes this much easier.
2. Make manual adjustments
Balancing is a starting point. You might want to:
- Round ingredient weights
- Slightly adjust a flavor ingredient
- Fine-tune a specific property using Quick Adjust (PAC/POD)
3. Test and iterate
- Make the recipe
- Taste and evaluate
- Note what needs adjustment
- Update your chart based on results
Tip! If a balance doesn’t fully converge, try clicking Balance again with the same or slightly relaxed class chips. The new algorithm is fast enough that running it a second time costs you essentially nothing.
Examples and Workflows
Example 1: Basic Vanilla Ice Cream Balance
Starting point: Simple recipe with basic ingredients
Goal: Create a well-balanced vanilla ice cream
Ingredients:
- Whole milk: 500g
- Heavy cream: 300g
- Sugar: 150g
- Skim milk powder: 30g
- Vanilla extract: 5g

Steps:
- Select chart: Choose “Ice Cream Base” from Default charts
- Check initial status:
- Total solids: RED (37.1%, target 39–45%)
- Serving temp: RED (-11.7°C, target -17 to -14)
- POD: RED (160, target 165–180)
- Click Balance → The Smart Balance dialog opens. Vanilla extract is pre-classified as Flav (because of its alcohol content); the other ingredients start as Free.
- Click Balance in the dialog. The algorithm runs in ~1 second.
- Review results:
- Milk Solids RED Value:25.3 Target 16–22
- Stabilizers/Water 0
- Emulsifier 0
This recipe needs another sugar source, a stabilizer and an emulsifier!
- Add Dextrose 100g
- Add Stabilizer 2g
- Add Emulsifier (Lecithin) 2g
Click Balance again. The Smart Balance dialog now pre-classifies the stabilizer as Stab and the lecithin as Emul based on their properties. Vanilla stays Flav. Click Balance.
Result: Well-balanced vanilla base ready for churning.

Troubleshooting
“Balance button doesn’t work”
Possible causes:
- ? No chart selected → Select a chart first
- ? Chart has no target ranges set → Edit chart to add Min/Max values
- ? All ingredients are locked → Unlock at least two ingredients in the Smart Balance dialog
“Balancing makes strange changes to my flavor ingredients”
This was the most common complaint with the old balancer. The fix is to use the Smart Balance dialog properly:
- Set anything that defines your flavor to Flav (±5% wiggle room)
- For ingredients you want completely untouched, use the lock toggle
- For very precise control, set a manual Min%/Max% range and leave the chip on Free
“Some properties won’t turn green”
Possible causes:
- Conflicting targets (impossible to achieve together)
- Not enough ingredient variety
- Too many ingredients pinned by chips or locks — the algorithm has nowhere left to move
Try:
- Click Get advice in the Balance result summary — it tells you what kind of ingredient would unlock the failing targets, or why nothing can
- Remove or relax less critical targets
- Add more ingredient variety
- Move some chips from Flav back to Free temporarily, or unlock ingredients
“The balancer kept my recipe unchanged”
If the balancer proposes a result that would leave more chart properties out of range than your starting recipe, it reverts the recipe to its original state and tells you so. This safety net prevents the algorithm from making your recipe worse in pursuit of a single hard target. To work around it:
- Relax tight chart targets
- Loosen ingredient bounds (move chips toward Free)
- Add more ingredient variety
Frequently Asked Questions
Q: Will balancing change my recipe completely?
A: No. The Smart Balance dialog lets you set per-ingredient bounds via class chips and locks before the algorithm runs. Pick Flav for flavor ingredients and lock anything that’s exactly right, and the recipe character stays intact.
Q: How do I know what targets to use?
A: Start with Default charts (Ice Cream Base, Gelato, etc.). These are based on professional formulations. Adjust based on your results.
Q: Can I balance without a chart?
A: No. Charts define the target properties. Without targets, the algorithm doesn’t know what to optimize.
Q: What do the class chips do?
A: Each chip applies a sensible weight range to the ingredient during balancing. Flav keeps a flavor within ±5% of its current weight; Stab and Emul cap stabilizer and emulsifier at professional dosages; Fib caps fiber at 5% of mix; HIS keeps high-intensity sweeteners within ±1%. Free lets the ingredient float freely (or within your manual Min%/Max%, if you’ve set one). See The Classes for the full table.
Q: Is the AI classification button free?
A: No, it’s a Premium feature. Free users can classify ingredients manually using the chips, which works exactly as well — AI is just a one-click shortcut.
Q: Will my old manual Min%/Max% settings still work?
A: Yes. When you open the Smart Balance dialog, ingredients with a manual range are detected and shown as Free with your range in the Range column. The balancer will use your manual range as long as you keep the chip on Free.
Q: What’s the difference between Lock and the Flav chip?
A: Lock freezes the weight completely — zero change allowed. Flav allows ±5% wiggle room, which is usually enough that the rest of the balance can still find a good solution without changing the character of the recipe. Lock is the right choice when you have an exact weight you don’t want negotiated.
Q: Why does balancing sometimes return the recipe unchanged?
A: The new algorithm has a safety net: if its proposed solution would leave more chart properties out of range than your starting recipe, it reverts to the original. This usually means your constraints are too tight to satisfy. Try relaxing chart ranges or moving some chips toward Free.
Q: Should I balance every recipe?
A: No. Use balancing for:
- ? New recipes
- ? Recipes with problems (too hard, too sweet, etc.)
- ? When replacing ingredients
Don’t balance:
- ? Recipes that already work well
- ? Just to see what happens (it will change your recipe!)
Q: What’s the difference between Balance and Quick Adjust (PAC/POD)?
A:
- Balance: Optimizes ALL chart properties simultaneously
- Quick Adjust: Changes ONE property quickly with minimal impact on others
Use Quick Adjust for tweaks, Balance for comprehensive optimization.
Q: Can I undo balancing?
A: Yes! Use the Undo button (Ctrl+Z) to revert changes. The app tracks your recipe history.
Summary
Automatic balancing is a powerful tool for creating well-balanced ice cream recipes:
Key points:
- Select a chart that matches your style
- Click Balance to open the Smart Balance dialog
- Review class chips for each ingredient (Flav for flavorings, Stab/Emul/Fib for technical ingredients, Free otherwise)
- Optionally let AI classify everything for you (Premium)
- Lock anything that must not change at all
- Click Balance in the dialog and let the algorithm optimize
- Use Quick Adjust (PAC/POD) for small tweaks afterwards
- Take snapshots to compare versions
- Test, taste, and iterate
Remember: Balancing is a tool, not a replacement for your expertise. Use it to handle the complex math while you focus on flavor and creativity.
Next steps:
- Try balancing a simple vanilla base recipe
- Experiment with different charts
- Create a snapshot before making changes
- Use Quick Adjust buttons for fine-tuning
- Build your own custom chart based on successful recipes
Happy ice cream making! ??
Technical Note! How the New Balancer Works
The balancer has been completely rewritten around a linear programming (LP) solver — specifically Google’s OR-Tools GLOP — replacing the older trust-region SQP code. In practice this means balancing is around 10× faster and significantly more reliable on recipes with tight constraints.
What the LP optimizes: a weighted sum of how far each chart property is from its target, with extra weight for being inside the property’s acceptable range vs. just being close to the target. All targets are scaled to “fraction of half-range” so big-number properties like PAC and small-number properties like stabilizer % compete on equal footing.
How non-linear properties are handled: Some chart properties (PAC normalized, FW%, freezing point, serving temperature) aren’t linear functions of ingredient weights. For those, the balancer fits a first-order approximation around the current weights, solves the LP, and then re-fits at the new weights. This outer loop typically converges in 3–7 iterations on realistic recipes, all in well under 2 seconds total.
Safety net: The balancer compares the result it found against your starting recipe. If the proposed solution would leave more properties out of range than the original (or noticeably worse total violation), the balancer reverts and reports it instead of corrupting your recipe. This is conservative by design — you can always loosen constraints and try again.
Why Recipe Balancing Can Still Be Difficult
Even with a much better solver, recipe balancing remains a hard problem because of your constraints, not the algorithm’s:
- Conflicting constraints – You might want high sweetness AND low sugar content — these can conflict. The LP will return the closest-possible solution but can’t conjure something physically impossible.
- Complex interactions – Adding milk affects fat, protein, sweetness, freezing point, and texture all at once. These interactions still take iterations to fully resolve when non-linear properties are involved.
- Narrow solutions – Even when a solution exists, it might require very precise amounts. Small variations push properties back out of range.
- Insufficient flexibility – If too many ingredients are pinned (Flav, Stab, Lock, etc.), there’s no room left for the algorithm to maneuver. This is the modern equivalent of the old “stuck in a local minimum” problem.
How to improve success:
- Loosen ranges slightly – Wider target ranges give more room for solutions
- Move some chips toward Free – More flexibility = more possible solutions
- Use fewer constraints – Every additional target range and pinned ingredient makes the problem harder
- Start from a working recipe – Modify successful recipes rather than starting from scratch
- Adjust one property at a time – Use Quick Adjust for small tweaks instead of full rebalancing
Remember: This isn’t a limitation of the software — it’s a fundamental mathematical challenge. Even the most powerful optimization algorithms can’t solve problems that have no solution.